
Are you frustrated with how much time it takes to create, deploy and manage an application on Kubernetes? Wouldn’t it be nice if you could focus on writing and delivering code instead of worrying about Kubernetes objects? Welcome to Shipa.

Shipa is designed to make it simple for developers to run their code on Kubernetes without having to know Kubernetes and for platform engineers to enforce controls and policies. With Shipa’s developer-centric portal, DevOps can eliminate the need for custom Terraform scripts, Helm charts, and YAML files so developers can get started with Kubernetes immediately. At the same time, Platform teams maintain full control over configurations, which reduces the security, cost, and compliance risks from configuration errors.
Shipa is an Application Management Framework. It abstracts the underlying cloud and Kubernetes infrastructure through a developer portal so developers can focus on application deployment and management rather than infrastructure-related objects and manifests. In contrast, platform engineering teams focus on implementing controls and policies for developers’ applications and services using Shipa’s developer portal.

Under this blog tutorial, we will walkthrough the feature-rich Shipa CLI and we will see how Developers can deploy application directly over Cloud without even caring about the underlying Kubernetes objects flawlessly. Below are the list of items which we will be covering –
- Installing Shipa CLI on your desktop
- Adding Shipa instance as a target on your CLI
- Creating user for login
- Listing the existing applications
- Creating & Removing the application
- Deploying the application
- Checking the available Platforms
- Creating & Managing Pool
- Creating an app and selecting Pool
- Listing the certificates
- Checking Logs
- Connecting external Kubernetes Cluster to your Shipa Pool
- Adding Shipa Node in AWS
- Security Management
- Create and deploy sample application from CI-CD tool
Installing Shipa CLI tool
In order to use and operate Shipa, you will need to download the Shipa CLI for your operating system (currently available for MacOS, Linux and Windows). Follow the below steps:
| MacOS | https://storage.googleapis.com/shipa-cli/shipa_darwin_amd64 |
| Linux | https://storage.googleapis.com/shipa-cli/shipa_linux_amd64 |
| Windows | https://storage.googleapis.com/shipa-cli/shipa_windows_amd64.exe |
Run the below command in order to setup Shipa CLI tool on your Mac system:
chmod +x shipa_darwin_amd64 && mv -v shipa_darwin_amd64 /usr/local/bin/shipaAdd your Shipa instance as a target on your CLI
Targets are used to manage the addresses of the remote Shipa servers.Each target is identified by a label and a HTTP/HTTPS address. Shipa’s client requires at least one target to connect to, there’s no default target. A user may have multiple targets, but only one will be used at a time.
[Captains-Bay]? >  shipa versionshipa version 1.0.1.

[Captains-Bay]? >  shipa target-add default http://34.105.46.12:8080 -s
New target default -> http://34.105.46.12:8080 added to target list and defined as the current target
[Captains-Bay]? >
Creating a user
After configuring the shipa target, we will proceed further and create a user.
[Captains-Bay]? >  shipa user-create admin@shipa.io
Password:
Confirm:
Error: you're not authenticated or your session has expired.
Calling the "login" command...Email: admin@shipa.io
Password:
Password:
Confirm:
Error: this email is already registered

Successfully logged in!
Once you create admin user, you should be able to login to remote Shipa platform.
[Captains-Bay]? >  shipa login
Email: admin@shipa.io
Password:
Successfully logged in!
[Captains-Bay]? >
Shipa requires users to be a member of at least one team in order to create an application or a service instance. Let us first check the list of team by running the below CLI:
[Captains-Bay]? >  shipa team-list
+--------+------------------+------+
| Team   | Permissions      | Tags |
+--------+------------------+------+
| admin  | app              |      |
|        | team             |      |
|        | service          |      |
|        | service-instance |      |
|        | cluster          |      |
|        | volume           |      |
|        | volume-plan      |      |
|        | webhook          |      |
+--------+------------------+------+
| system | app              |      |
|        | team             |      |
|        | service          |      |
|        | service-instance |      |
|        | cluster          |      |
|        | volume           |      |
|        | volume-plan      |      |
|        | webhook          |      |
+--------+------------------+------+
[Captains-Bay]? >
Add an SSH key
Next, we need to send a public key to the git server used by Shipa. Run the below command to accomplish this.
[Captains-Bay]? >  shipa key-add my-rsa-key ~/.ssh/id_rsa.pubKey "my-rsa-key" successfully added!
[Captains-Bay]? >
Listing the application
Shipa comes with a capability to list all applications that a user has access to. Application access is controlled by teams. If a user’s team has access to an application, then this user also has access to it. Run the below command to list out all the applications:
[Captains-Bay]? >  shipa app-list
+------------------------------+-----------+--------------------------------------------------------+
| Application                  | Units     | Address                                                |
+------------------------------+-----------+--------------------------------------------------------+
| aks-app1                     | 1 started | http://aks-app1.34.82.73.71.nip.io                     |
+------------------------------+-----------+--------------------------------------------------------+
| dashboard                    | 1 started | http://dashboard.34.82.73.71.nip.io                    |
+------------------------------+-----------+--------------------------------------------------------+
| eks-app1                     | 1 started | http://eks-app1.34.82.73.71.nip.io                     |
+------------------------------+-----------+--------------------------------------------------------+
| gke-app1                     | 1 started | http://gke-app1.34.82.73.71.nip.io                     |
+------------------------------+-----------+--------------------------------------------------------+
| gke-app2                     | 1 started | http://gke-app2.34.82.73.71.nip.io                     |
+------------------------------+-----------+--------------------------------------------------------+
| longhorn-app                 | 1 started | http://longhorn-app.34.82.73.71.nip.io                 |
+------------------------------+-----------+--------------------------------------------------------+
| postgres-service-service-app | 1 started | http://postgres-service-service-app.34.82.73.71.nip.io |
+------------------------------+-----------+--------------------------------------------------------+
[Captains-Bay]? >| As shown above, there are multiple applications hosted on various Cloud platform like AWS EKS, GKE etc. |
Application Information
The below command shows information about a specific application, it’s state, platform, git repository, and more. Users need to be a member of a team that has access to the application to be able to see information about it.
[Captains-Bay]? >  shipa app-info -a dashboard
Application: dashboard
Description:
Tags:
Dependency Files:
Repository: git@34.105.46.12:dashboard.git
Platform: staticTeams: admin
Address: http://dashboard.34.82.73.71.nip.io
Owner: admin@shipa.io
Team owner: admin
Deploys: 1
Pool: theonepool
Quota: 1/4 units
Routing settings:
   1 version => 1 weight

Units [web]: 1
+---------+----------------------------------+---------+---------------+------+
| Version | Unit                             | Status  | Host          | Port |
+---------+----------------------------------+---------+---------------+------+
| 1       | dashboard-web-1-5d58db8779-ztgcs | started | 34.105.121.67 | 8888 |
+---------+----------------------------------+---------+---------------+------+
App Plan:+---------------+--------+------+-----------+---------+
| Name          | Memory | Swap | Cpu Share | Default |

+---------------+--------+------+-----------+---------+
| autogenerated | 0      | 0    | 100       | false   |
+---------------+--------+------+-----------+---------+
Routers:
+---------+---------+------+------------------------------+--------+
| Name    | Type    | Opts | Address                      | Status |
+---------+---------+------+------------------------------+--------+
| traefik | traefik |      | dashboard.34.82.73.71.nip.io |        |
+---------+---------+------+------------------------------+--------+
Checking the available Platforms
A platform is a well-defined pack with installed dependencies for a language or framework that a group of applications will need. A platform can also be a container template (Docker image).
Platforms are easily extendable and managed by Shipa. Every application runs on top of a platform.
You can list out the platforms by running the below CLI:
[Captains-Bay]? >  shipa platform-list
- go
- java
- nodejs
- php
- python
- static
Listing the app

Verifying Logs
[Captains-Bay]? > shipa app-log --app collabnixRemoving app
If the application is bound to any service instance, all binds will be removed before the application gets deleted Do check the service-unbind command for this in Shipa documentation. In our case, we can go ahead and use app-remove option to remove an app smoothly.
[Captains-Bay]? >  shipa app-remove --app collabnix
Are you sure you want to remove app "collabnix"? (y/n) y
---- Removing application "collabnix"...
Failed to remove router backend from database: not found
---- Done removing application. Some errors occurred during removal.
running autoscale checks
finished autoscale checks
[Captains-Bay]? >
Creating an app and selecting a specific pool
Let’s create a new application called collabnix and assign it to a team called admin along with existing pool called gke-longhorn.
[Captains-Bay]? >  shipa app-create collabnix python --team admin --pool gke-longhorn
App "collabnix" has been created!
Use app-info to check the status of the app and its units.
Your repository for "collabnix" project is "git@34.105.46.12:collabnix.git"
[Captains-Bay]? >
Deploying an application
Currently, Shipa supports 4 application deployment options:
- CI/CD
- Git
- app-deploy
- Docker image
[Captains-Bay]? >  shipa app-deploy . -a collabnix
context args: [.]
Uploading files (0.02MB)... 100.00% Processing ok
 ---> collabnix-v1-build - Successfully assigned shipa-gke-longhorn/collabnix-v1-build to gke-lhcl-default-pool-c6caa3b2-rc9k [default-scheduler]
https://files.pythonhosted.org/packages/98/13/a1d703ec396ade42c1d33df0e1cb691a28b7c08
/

...
 ---> Sending image to repository (34.105.46.12:5000/shipa/app-collabnix:v1)
The push refers to repository [34.105.46.12:5000/shipa/app-collabnix]
b428a7ad5d5f: Pushed
...

OK
running autoscale checks
finished autoscale checks
Listing the Deployments
You can use “app-deploy-list” option to list information about deploys for an application. Users can list available images with the app-deploy-list command.
[Captains-Bay]? >  shipa app-deploy-list  -a collabnix
+--------+----------------------------------------------+------------+----------------+-----------------------------+-------+
| Active | Image (Rollback)                             | Origin     | User           | Date (Duration)             | Error |
+--------+----------------------------------------------+------------+----------------+-----------------------------+-------+
| *      | 34.105.46.12:5000/shipa/app-collabnix:v1 (*) | app-deploy | admin@shipa.io | 12 Jun 20 00:13 IST (01:55) |       |
+--------+----------------------------------------------+------------+----------------+-----------------------------+-------+
[Captains-Bay]? >
Listing the certificates
You can run the below command to list an application TLS certificates.
[Captains-Bay]? >  shipa certificate-list -a collabnix
+--------------+--------+---------------------+
| Router  | CName     | Expires | Issuer | Subject |
+---------+----------------+--------+---------+
| traefik | collabnix.34.82.73.71.nip.io | -| - | -  |
+---------+----------------+--------+---------+
Checking logs
[Captains-Bay]? >  shipa app-log -a collabnix
2020-06-12 00:13:49 +0530 [shipa][api]:   ---> collabnix-web-1-5c667c4fc5-d6v7j - Started container collabnix-web-1 [kubelet, gke-lhcl-default-pool-c6caa3b2-rc9k]
2020-06-12 00:13:49 +0530 [shipa][api]:  ---> 1 of 1 new units ready
...
[Captains-Bay]? >
Using Git
For Shipa, a platform is provisioner dependent. The command below creates a new application using the given name and platform. Once it is completed, it shows the GITHUB repository URL.
[Captains-Bay]? >  shipa app-create collabnix1 python --team admin --pool gke-longhorn
App "collabnix1" has been created!
Use app-info to check the status of the app and its units.
Your repository for "collabnix1" project is "git@34.105.46.12:collabnix1.git"
[Captains-Bay]? >
git push git@34.105.46.12:collabnix1.git  master

…
remote:  ---> Running a security scan
remote:  ---> Found 0 vulnerability(ies)

...
remote: HEAD is now at a0bb216... Added
remote: .shipa-ci.yml not found and post-receive hook is disabledTo 34.105.46.12:collabnix1.git * [new branch]      master -> master
[Captains-Bay]? >
Go to Shipa Dashboard > Click on “Application” > Pick up endpoint http://collabnix1.34.82.73.71.nip.io/ and it will displays the below error while accessing it via browser:
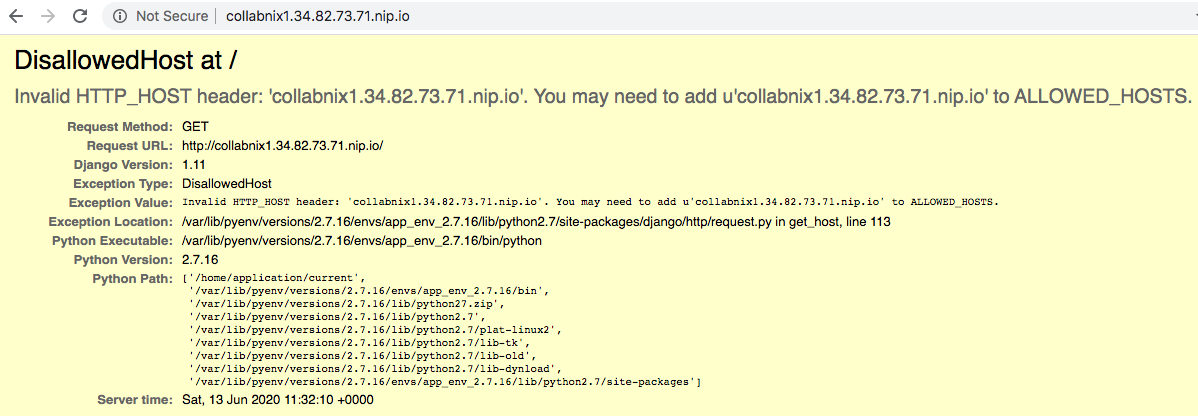
How to fix it?
If you go into the file blog/settings.py, there is a line called ALLOWED_HOSTS.
Inside that line, you have an entry like xxxx.nip.io, just replace that entry with collabnix1.34.82.73.71.nip.io (the cname Shipa gave to your app) , save the file
With that saved, please run the normal git add . , git commit and git push
Once deployment is complete, your blog application should be available on: collabnix1.34.82.73.71.nip.io/admin
.

Accessing Shell
[Captains-Bay]? >  shipa app-shell -a collabnix1
ubuntu@collabnix1-web-1-f96f7bf9-sh4cz:/home/application/current$ cat /etc/os-release
NAME="Ubuntu"
VERSION="18.04.3 LTS (Bionic Beaver)"
ID=ubuntu
ID_LIKE=debian
PRETTY_NAME="Ubuntu 18.04.3 LTS"
VERSION_ID="18.04"
HOME_URL="https://www.ubuntu.com/"
SUPPORT_URL="https://help.ubuntu.com/"
BUG_REPORT_URL="https://bugs.launchpad.net/ubuntu/"
PRIVACY_POLICY_URL="https://www.ubuntu.com/legal/terms-and-policies/privacy-policy"
VERSION_CODENAME=bionic
UBUNTU_CODENAME=bionic
ubuntu@collabnix1-web-1-f96f7bf9-sh4cz:/home/application/current$
Listing the Cluster
Shipa clusters allows registering existing clusters of external provisioners in the platform. Currently, Kubernetes is the only supported external cluster provisioner.
On Shipa, clusters are directly attached to a pool.
[Captains-Bay]? >  shipa cluster-list
+-------------+-------------+--------------+-------+-------+
| Name         | Provisioner | Addresses                                               | Custom Data | Default | Pools        | Teams | Error |
+---------------------------+--------------+-------+-------+
| aks          | kubernetes  | https://aks-ajeet-raina-dns-afc18577.hcp.eastus.azmk8s↵ |             | false   | aks
          |       |       |
|              |             | .io:443                                                |             |         |              |       |       |
+--------------+--------+---------+--------------+--------+
| eks          | kubernetes  | https://D7CB020B4656D5E5BFCC096C529A3BD7.gr7.us-east-1↵ |             | false   | eks          |       |       |
|              |             | .eks.amazonaws.com                                      |             |         |              |       |       |
+--------------+------------------+--------------+--+-------+
| gke          | kubernetes  | https://35.238.48.234                                   |             | false   | gke          |       |       |+--------------+-------------+---------------------------------------------------------+-------------+---------+--------------+-------+-------+
| gke-longhorn | kubernetes  | https://35.205.250.127                                  |             | false   | gke-longhorn |       |       |+--------------+-------------+---------------------+-------+-------+
| theonepool   | kubernetes  | 10.64.0.1:443                                           |             | false   | theonepool   |       |       |+--------------+-------------+-----------------------+-------+-------+
[Captains-Bay]? >
[Captains-Bay]? > shipa app-list -n collabnix1
+-------------+-----------+--------------------------------------+
| Application | Units | Address |
+-------------+-----------+--------------------------------------+| collabnix1 | 1 started | http://collabnix1.34.82.73.71.nip.io |+-------------+-----------+--------------------------------------+
[Captains-Bay]? >Security Management
The command below lists all security scans for a specific image
[Captains-Bay]? >  shipa app-security list -a collabnix1
1. [Deployment] scan at 13 Jun 2020 11:30, 0 vulnerability(es), 0 ignored
[Captains-Bay]? >
Creating a new database and binding your application
Let us try to create a new instance of PostgreSQL and bind it to collabnix1 app.

Persistent Volume
You can list the existing volume plans via volume-plan-list CLI:
[Captains-Bay]? >  shipa volume-plan-list
Error: you're not authenticated or your session has expired.
Calling the "login" command...
Email: admin@shipa.io
Password:
+----------+---------------+-------+
| Name     | Storage Class | Teams |
+----------+---------------+-------+
| longhorn | longhorn      | []    |
+----------+---------------+-------+
Successfully logged in!
[Captains-Bay]? >
Listing the Volume
[Captains-Bay]? >  shipa volume-list
+---------+----------+--------------+-------+--------------------+------+-----------------------+| Name    | Plan     | Pool         | Team  | Plan Storage Class | Opts | Binds                 |+---------+----------+--------------+-------+--------------------+------+-----------------------+| lh-vol1 | longhorn | gke-longhorn | admin | longhorn           |      | longhorn-app:       ↵ ||         |          |              |       |                    |      | /mnt/lh-vol1:rw       |+---------+----------+--------------+-------+--------------------+------+-----------------------+
[Captains-Bay]? >
Creating Volume
[Captains-Bay]? >  shipa volume-create collabvol longhorn -p gke-longhorn -t admin --am ReadWriteOnce --capacity=1Gi
Volume successfully created.
[Captains-Bay]? >
Run the below CLI to verify the volumes as shown below:
[Captains-Bay]? >  shipa volume-list
+-----------+----------+--------------+-------+--------------------+------+------------------------------+| Name      | Plan     | Pool         | Team  | Plan Storage Class | Opts | Binds                        |+-----------+----------+--------------+-------+--------------------+------+------------------------------+| collabvol | longhorn | gke-longhorn | admin | longhorn           |      |                              |+-----------+----------+--------------+-------+--------------------+------+------------------------------+| lh-vol1   | longhorn | gke-longhorn | admin | longhorn           |      | longhorn-app:/mnt/lh-vol1:rw |+-----------+----------+--------------+-------+--------------------+------+------------------------------+
[Captains-Bay]? >
As you see above, it is not bound to anything. So, let’s go ahead and try to bind it using the below comand:
[Captains-Bay]? >  shipa volume-bind collabvol /mnt/collabvol -a collabnix1
---- restart the app "collabnix1" ----
---- Updating units [web] ----
 ---> 1 of 1 new units created
 ---> 0 of 1 new units ready
 ---> 1 old units pending termination
  ---> collabnix1-web-3-7d847f5646-n4sh7 - pod has unbound immediate PersistentVolumeClaims (repeated 3 times) [default-scheduler]
  ---> collabnix1-web-3-7d847f5646-n4sh7 - Container image "34.105.46.12:5000/shipa/app-collabnix1:v3" already present on machine [kubelet, gke-lhcl-default-pool-c6caa3b2-rc9k]
  ---> collabnix1-web-3-7d847f5646-n4sh7 - Created container collabnix1-web-3 [kubelet, gke-lhcl-default-pool-c6caa3b2-rc9k]
  ---> collabnix1-web-3-7d847f5646-n4sh7 - Started container collabnix1-web-3 [kubelet, gke-lhcl-default-pool-c6caa3b2-rc9k]
 ---> 1 of 1 new units ready
  ---> collabnix1-web-3-6f6c6d6f58-wl8sn - Stopping container collabnix1-web-3 [kubelet, gke-lhcl-default-pool-c6caa3b2-rc9k]
 ---> Done updating unitsVolume successfully bound.
[Captains-Bay]? >
Verifying the mount point
shipa app-shell -a collabnix1
ubuntu@collabnix1-web-3-7d847f5646-n4sh7:/home/application/current$ mount | grep collab
/dev/longhorn/pvc-3c7afeca-af35-11ea-9f87-42010a8401eb on /mnt/collabvol type ext4 (rw,relatime,data=ordered)
ubuntu@collabnix1-web-3-7d847f5646-n4sh7:/home/application/current$
Pool Management
Pools on Shipa can host two types of provisioners:
- Kuberrnetes: Which we can then tie the pool to any K8s cluster
- Shipa nodes: Through Shipa, you can also create nodes on EC2, GCP and Azure using IaaS and attach them to a pool. Shipa nodes are basically Docker nodes, that you can use to deploy applications, enforce security and so on. Exactly the same you do with K8s nodes/clusters

When you create a pool and you don’t specify a provisioner, it automatically selects Shipa node (described as “default” when you do a shipa pool-list). See below:
[Captains-Bay]? >  shipa pool-list
+--------------+---------+-------------+---------------+---------+| Pool         | Kind    | Provisioner | Teams         | Routers |+--------------+---------+-------------+---------------+---------+| aks          |         | kubernetes  | admin         | traefik |+--------------+---------+-------------+---------------+---------+| collabpool   |         | default     | admin, system | traefik |+--------------+---------+-------------+---------------+---------+| eks          |         | kubernetes  | admin         | traefik |+--------------+---------+-------------+---------------+---------+| gke          |         | kubernetes  | admin         | traefik |+--------------+---------+-------------+---------------+---------+| gke-longhorn |         | kubernetes  | admin         | traefik |+--------------+---------+-------------+---------------+---------+| theonepool   | default | kubernetes  |               | traefik |+--------------+---------+-------------+---------------+---------+[Captains-Bay]? >
Notes: Right now, pools on Shipa can only host one type of provisioner. It has to be either shipa or kubernetes
[Captains-Bay]? >  shipa pool-add collabpool
Pool successfully registered.
[Captains-Bay]? >  shipa pool-list
+--------------+---------+-------------+---------------+---------+| Pool         | Kind    | Provisioner | Teams         | Routers |+--------------+---------+-------------+---------------+---------+| aks          |         | kubernetes  | admin         | traefik |+--------------+---------+-------------+---------------+---------+| collabpool   |         | default     | admin, system | traefik |+--------------+---------+-------------+---------------+---------+| eks          |         | kubernetes  | admin         | traefik |+--------------+---------+-------------+---------------+---------+| gke          |         | kubernetes  | admin         | traefik |+--------------+---------+-------------+---------------+---------+| gke-longhorn |         | kubernetes  | admin         | traefik |+--------------+---------+-------------+---------------+---------+| theonepool   | default | kubernetes  |               | traefik |+--------------+---------+-------------+---------------+---------+
Let us go ahead and updates attributes for a specific pool as shown below:
[Captains-Bay]? >  shipa pool-update collabpool --plan k8s
Pool successfully updated.
[Captains-Bay]? >  shipa pool-list
+--------------+---------+-------------+---------------+---------+| Pool         | Kind    | Provisioner | Teams         | Routers |+--------------+---------+-------------+---------------+---------+| aks          |         | kubernetes  | admin         | traefik |+--------------+---------+-------------+---------------+---------+| collabpool   |         | default     | admin, system | traefik |+--------------+---------+-------------+---------------+---------+| eks          |         | kubernetes  | admin         | traefik |+--------------+---------+-------------+---------------+---------+| gke          |         | kubernetes  | admin         | traefik |+--------------+---------+-------------+---------------+---------+| gke-longhorn |         | kubernetes  | admin         | traefik |+--------------+---------+-------------+---------------+---------+| theonepool   | default | kubernetes  |               | traefik |+--------------+---------+-------------+---------------+---------+[Captains-Bay]? >
Attached is a sample yaml file which one can use to update the collabpool or create new ones also. You can do it with the command: shipa pool-update collabpool collabpool-config.yaml
ShipaPool: collabpool
Resources:
   General:
      Setup:
         Force: true
         Default: false
         Public: false
         Provisioner: kubernetes
      Plan:
Name: k8s
      AppQuota:
         Limit: 8
      Security:
         Disable-Scan: false
         Scan-Platform-Layers: true
          Ignore-Components:
            - systemd
            - bash
            - glibc
            - tar
         Ignore-CVES:
            - CVE-2019-18276
            - CVE-2016-2781
            - CVE-2019-9169
      Access:
         Append:
            - admin
      Services:
         Append:
            - postgres-service
[Captains-Bay]? > shipa pool-update collabpool collabpool-config.yaml
Pool successfully updated.
[Captains-Bay]? >Please note that:
- Once you create a new pool, in order to be able to deploy apps to it, you have to assign that pool to a cluster (unless you will add a new cluster later and will use that new pool)-
- One cluster can host multiple pools, so you can assign multiple pools you create to a single cluster. For each pool, Shipa creates a different namespace inside the K8s cluster, so workloads will be isolated
- You can also adjust the security scan configuration by adding or removing exceptions, disabling scans for platform layer, disable it all and so on. You can always make changes and use the shipa pool-update command for the changes to be applied
You can update an existing cluster to assign it to your new pool with the following command: shipa cluster-update gke-longhorn –addr https://35.205.250.127 –pool gke-longhorn –pool collabpool
[Captains-Bay]? >  shipa cluster-update gke-longhorn --addr https://35.205.250.127  --pool gke-longhorn --pool collabpool
Cluster successfully updated.
[Captains-Bay]? >
After that, your new pool is ready to receive apps, so you can use it when creating and deploying apps.
Exporting Pool Configuration
[Captains-Bay]? >  shipa pool-config-export collabpool -o mypoolconfig
[Captains-Bay]? >  cat mypoolconfigShipaPool: collabpool
Resources:
  General:
    Setup:
      Default: false
      Public: true
      Provisioner: ""
      Force: false
      KubeNamespace: ""
    Plan:
      Name: k8s
    Security:
      Disable-Scan: false
      Scan-Platform-Layers: false
      Ignore-Components: []
      Ignore-CVES: []
    Access:
      Append:
      - admin
      - system
      Blacklist: []
    Services:
      Append:
      - postgres-service
      Blacklist: []
    Volumes: []
    AppQuota:
      Limit: unlimited
  ShipaNode:
    Drivers: []
    AutoScale: null
[Captains-Bay]? >
Adding Shipa node in AWS
Attached is a sample of a pool configuration that you can use to create Shipa provisioned pools. After the pool is created, you can do the following:
ShipaPool: shipa-pool
Resources:
   General:
      Setup:
         Force: true
         Default: false
         Public: false
         Provisioner: shipa
      Plan:
         Name: k8s
      AppQuota:
         Limit: 5
      Security:
         Disable-Scan: false
         Scan-Platform-Layers: false
   ShipaNode:
      Drivers:
         - amazonec2
      AutoScale:
         MaxContainer: 10
         MaxMemory: 0
         ScaleDown: 1.33
Rebalance: true- Add your cloud credentials: More info on this link https://learn.shipa.io/docs/cloud-credentials#adding-credentials
- Add nodes: You can follow the instructions on https://learn.shipa.io/docs/managed-nodes-1#adding-new-nodes but here is an example of adding a Shipa node in AWS:
- shipa node-add driver=amazonec2 amazonec2-region=eu-central-1 amazonec2-zone=a
- amazonec2-instance-type=c5.xlarge pool=shipa-pool name=node-name credential=aws
Please note:
- A Shipa pool can host nodes from multiple cloud providers and will distribute your application units/containers across multiple clouds/nodes
- You can adjust the field Drivers in the shipa config file to adjust which cloud providers the pool can host nodes from. You can place one or multiple. Accepted values are amazonec2, google, azure
Security Management
[Captains-Bay]? >  shipa app-security-list  -a collabnix1
1. [Deployment] scan at 13 Jun 2020 11:30, 0 vulnerability(es), 0 ignored
2. [Deployment] scan at 13 Jun 2020 15:14, 0 vulnerability(es), 0 ignored
3. [Deployment] scan at 13 Jun 2020 15:17, 0 vulnerability(es), 0 ignored
..
11. [    Manual] scan at 17 Jun 2020 09:13, 0 vulnerability(es), 0 ignored
AutoScalibility
Using Shipa’s cloud provider native integration, Shipa manages the created nodes, perform self-healing, auto-scale and others. Let us look at the autoscability feature. The command below runs node auto scale checks once. Auto scaling checks may trigger the addition, removal or rebalancing of nodes, as long as these nodes were created using an IaaS provider registered in Shipa.
[Captains-Bay]? >  shipa node-autoscale-run
Are you sure you want to run auto scaling checks? (y/n) yfinished autoscale checks
[Captains-Bay]? >
Next, let us lists the current configuration for Shipa’s autoscale, including the set of rules and the current metadata filter.
[Captains-Bay]? >  shipa node-autoscale-info
Rules:
+------+---------------------+------------------+------------------+--------------------+---------+| Pool | Max container count | Max memory ratio | Scale down ratio | Rebalance on scale | Enabled |+------+---------------------+------------------+------------------+--------------------+---------+|      | 0                   | 0.0000           | 1.3330           | true               | true    |+------+---------------------+------------------+------------------+--------------------+---------+
[Captains-Bay]? >
Conclusion
If you are looking out for a platform that allows you to think and operate applications rather than infrastructure when delivering services, across any infrastructure, then Shipa is a perfect solution for you.
Comments are closed.