How to build Wasm container and push it to Docker Hub
ers and beyond. As developers explore the potential of Wasm, containerization becomes an attractive option for packaging and deploying Wasm applications. In this blog post, we will guide you through the process of pushing your first Wasm container to Docker Hub, a popular container registry. By following these steps, you can unleash the full potential of Wasm in a containerized environment.
Prerequisites:
Before we begin, ensure you have the following prerequisites in place:
- Install Docker Desktop
- Turns on the experimental containerd image store to allow the ability to run Wasm workloads

Getting Started
Step 1. Installing Wasm pack
This tool seeks to be a one-stop shop for building and working with rust- generated WebAssembly that you would like to interop with JavaScript, in the browser or with Node.js. wasm-pack helps you build rust-generated WebAssembly packages that you could publish to the npm registry, or otherwise use alongside any javascript packages in workflows that you already use, such as webpack.
curl https://rustwasm.github.io/wasm-pack/installer/init.sh -sSf | sh
Installing it from source
To install from source on any platform:
cargo install wasm-pack
This command creates the necessary project structure and files, including a src directory that contains your Wasm code.
Step 2: Create a Wasm Project
Let’s create a simple Wasm project. Open your preferred code editor and create a new directory for your project. Inside this directory, initialize a new Wasm project using the Wasm Pack CLI:
wasm-pack new wasm-project
Here’s the result:
[INFO]: ⬇️  Installing cargo-generate...
🐑  Generating a new rustwasm project with name 'wasm-project'...
🔧   Destination: /Users/ajeetsraina/august/wasm-project ...
🔧   project-name: wasm-project ...
🔧   Generating template ...
[ 1/12]   Done: .appveyor.yml                                                   [ 2/12]   Done: .gitignore                                                      [ 3/12]   Done: .travis.yml                                                     [ 4/12]   Done: Cargo.toml                                                      [ 5/12]   Done: LICENSE_APACHE                                                  [ 6/12]   Done: LICENSE_MIT                                                     [ 7/12]   Done: README.md                                                       [ 8/12]   Done: src/lib.rs                                                      [ 9/12]   Done: src/utils.rs                                                    [10/12]   Done: src                                                             [11/12]   Done: tests/web.rs                                                    [12/12]   Done: tests                                                           🔧   Moving generated files into: `/Users/ajeetsraina/august/wasm-project`...
💡   Initializing a fresh Git repository
✨   Done! New project created /Users/ajeetsraina/august/wasm-project
[INFO]: 🐑 Generated new project at /wasm-project
Step 3. Compile your Wasm code into distributable Format
wasm-pack build --target web
[INFO]: 🎯  Checking for the Wasm target...
[INFO]: 🌀  Compiling to Wasm...
   Compiling proc-macro2 v1.0.60
   Compiling quote v1.0.28
   Compiling unicode-ident v1.0.9
   Compiling wasm-bindgen-shared v0.2.86
   Compiling bumpalo v3.13.0
   Compiling log v0.4.19
   Compiling once_cell v1.18.0
   Compiling wasm-bindgen v0.2.86
   Compiling cfg-if v1.0.0
   Compiling syn v2.0.18
   Compiling wasm-bindgen-backend v0.2.86
   Compiling wasm-bindgen-macro-support v0.2.86
   Compiling wasm-bindgen-macro v0.2.86
   Compiling console_error_panic_hook v0.1.7
   Compiling wasm-project v0.1.0 (/Users/ajeetsraina/august/wasm-project)
warning: function `set_panic_hook` is never used
 --> src/utils.rs:1:8
  |
1 | pub fn set_panic_hook() {
  |        ^^^^^^^^^^^^^^
  |
  = note: `#[warn(dead_code)]` on by default

warning: `wasm-project` (lib) generated 1 warning
    Finished release [optimized] target(s) in 37.37s
[INFO]: Optimizing wasm binaries with `wasm-opt`...
[INFO]: Optional fields missing from Cargo.toml: 'description', 'repository', and 'license'. These are not necessary, but recommended
[INFO]: ✨   Done in 41.85s
[INFO]: 📦   Your wasm pkg is ready to publish at /Users/ajeetsraina/august/wasm-project/pkg.
This command compiles your Wasm code into a distributable format that can be used within web browsers.
Step 4: Create a Dockerfile
Now, let’s create a Dockerfile to define the container image. In your project directory, create a new file named Dockerfile and add the following content:
# Base image
FROM nginx:alpine

# Copy the Wasm module to the nginx default HTML directory
COPY ./pkg /usr/share/nginx/html
This Dockerfile starts from the nginx:alpine base image and copies the compiled Wasm module into the default HTML directory of the Nginx server.
Step 5: Build and Tag the Docker Image:
With the Dockerfile in place, you can build the Docker image. Open a terminal, navigate to the project directory, and execute the following command:
docker build -t ajeetraina/first-wasm-container .
This command builds the Docker image using the provided Dockerfile and tags it with the name firstwasm-container. The . at the end denotes the current directory as the build context.
Step 6: Push the Image to Docker Hub
To make your Wasm container available on Docker Hub, you need to push the image to your Docker Hub repository. Follow these steps:
Log in to Docker Hub using the docker login command. Provide your Docker Hub credentials when prompted.
Tag the Docker image with your Docker Hub username and repository name:
docker tag ajeetraina/first-wasm-container ajeetraina/first-wasm-container:1.0.0
Step 7. Push the tagged image to Docker Hub
$ docker push ajeetraina/first-wasm-container:1.0.0
This command pushes the Docker image to your Docker Hub repository, making it publicly accessible.
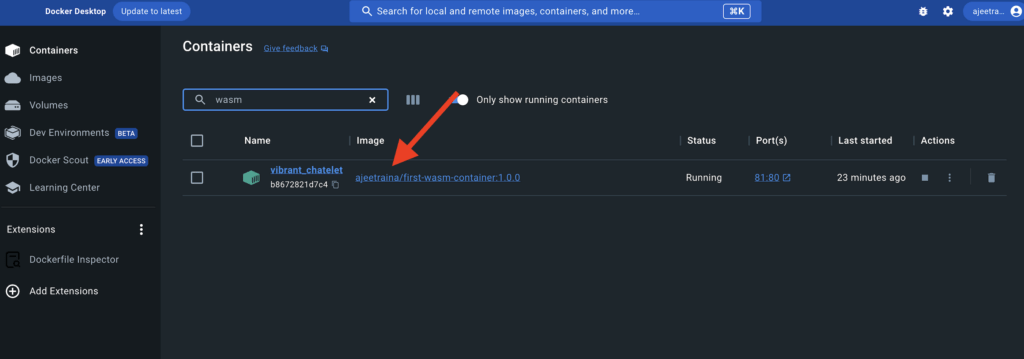
Viewing the Wasm container on Docker Desktop

Conclusion
Congratulations! You have successfully pushed your first Wasm container to Docker Hub. By containerizing your Wasm applications, you can take advantage of the benefits that Docker offers, such as ease of deployment, scalability, and portability. This opens up new possibilities for distributing and running Wasm code across various platforms and environments. Harness the power of Wasm and Docker to unlock the full potential of your applications in the modern era of containerization. Happy coding!