Do you want to use the planar tracker feature of Wondershare Filmora? But don’t have any idea about this feature? Don’t panic.
This feature is crucial for tracking planes or 2D surfaces within a video, meaning that you can apply effects or even mosaic the plane surfaces effectively. In video editing, tracking tools such as a planar tracker are useful for creating good and lively videos for presentations.
This review guide will explain what the planar tracker is in Filmora and how it works so that you can get to know the method to improve your video editing. So, without wasting any seconds, dive into this informative guide!
Part 1: What Does Planar Tracker Mean?
In video editing work, it is possible to track a flat surface or object, which is known as planar tracking. Compared to point tracking, which tracks certain points on the video (e.g., the corners or edges), planar tracking tracks the whole surface area of the object, a process that is precise and more stable. This method is particularly helpful with textured subjects or larger areas that are in motion within the frame, for example, screens or walls.
In contrast with 3D tracking, which tracks an object’s movement within the 3D space, or point tracking, planar tracking provides greater accuracy in the case of surfaces that change, rotate, or distort in a scene. It is especially useful for attaching a graphic or some text to a moving object that doesn’t change its form; for instance, applying a logo to a car door that is moving or pacing text on a computer screen.

Image Name: planar-tracker-1.jpg
Alt Text: planar tracking
Benefits of Planar Tracker:
- Accuracy: Works with larger areas instead of particular points, making the application better suited to attaching objects.
- Stability: Best to be used in situations such as steadying the scene or applying effects over a moving object.
- Flexibility: This is appropriate for utilization on surfaces that twist or flip during the shot.
How It Functions:
The planar tracker studies how the surface of an object moves across a video and generates a motion path. Due to this, editors can paste graphics, effects, or texts that follow the surface of the object perfectly. This makes it a useful tool for improving the visual narrative aspect of video-centered projects.
Part 2: Wondershare Filmora’s Planar Tracker: Know The Features!
Now move towards the next topic, where we will explain how Wondershare Filmora is a perfect tool for planar tracking.
So, Wondershare Filmora is one of the versatile video editing software, with many features, such as the planar tracker. This feature helps you keep track of and even control the planes within your video shot. Hence, we can say that it opens up a world of creativity. Moreover, its user-friendly interface makes your task easier than you have ever thought about! To know in depth about its planar tracker feature, go through the details below:
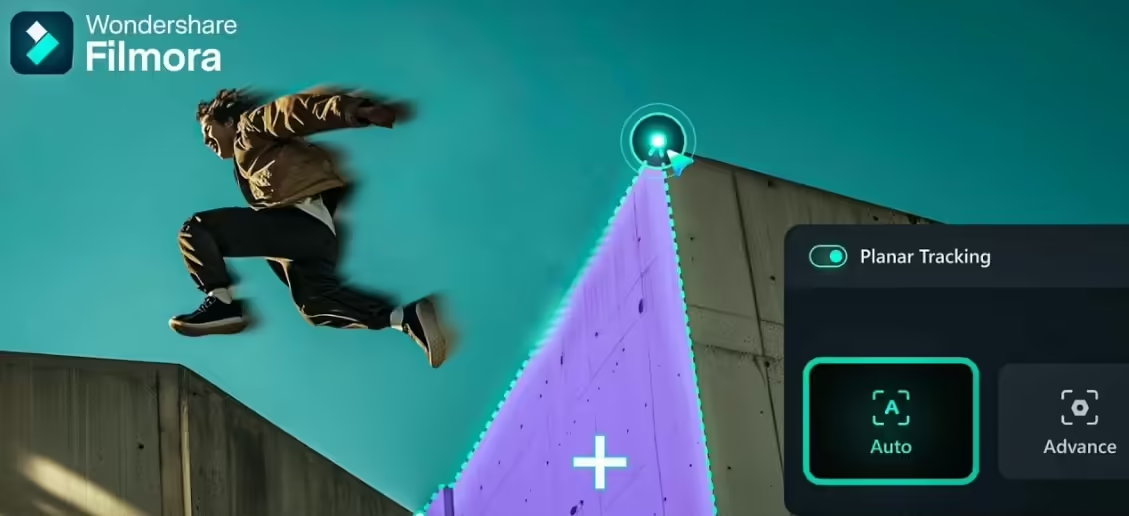
Key Features of Filmora’s Planar Tracker:
Four-Point Tracking
The planar tracker employs a four-point tracking algorithm to ensure it detects and tracks flat regions within your video. It does this in such a way that allows you to accurately place text, images, or another video on the tracked surface—even if it transforms or rotates.
Automatic and Advanced Tracking Modes
Automatic and advanced tracking modes are provided by Filmora in order to reach different users. The automatic mode makes it easier by automatically following the surface; however, the advanced mode gives an option for the most experienced users.
Diverse Application Scenarios
The planar tracker may be employed in the following modes, designed to fit numerous creative challenges:
- Switching billboards or signs for customized advertisements.
- Applying dynamic texting or images to moving or dynamic areas.
- Changing content present in the video.
Pros of Filmora’s Planar Tracker:
- Filmora has a simple layout and design; even if you are new to editing, you are going to find it quite easy to work with.
- Besides the Planar Tracker, Filmora is equipped with other cutting-edge and powerful tools like video effects, audio editing, color correction, etc.
- High compatibility with operating systems such as Windows and MacOS. It also runs fine with Androids and iPhones.
- You can directly upload your videos on various social media sites like YouTube, TikTok, and Vimeo.
Pricing:
- You can use its free version if you are running out of money.
- Its basic plan costs US $9.99/month.
- For the advanced plan, you need to pay US $34.99/yr.
- To get a subscription to the perpetual plan, it costs US $49.99.
Part 3: Step-by-Step Guide Using Wondershare Filmora!
Hope you find the details of Wondershare Filmora useful. We have also mentioned its step-by-step guide on how the planar tracker works in this tool.
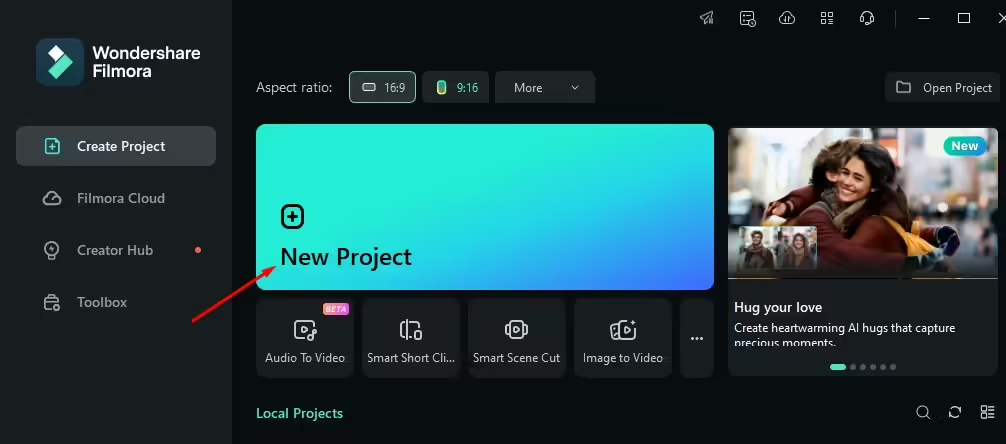
Step 1: Download Wondershare Filmora’s latest version from its official website. Then click on its icon to open and navigate to the New Project option.
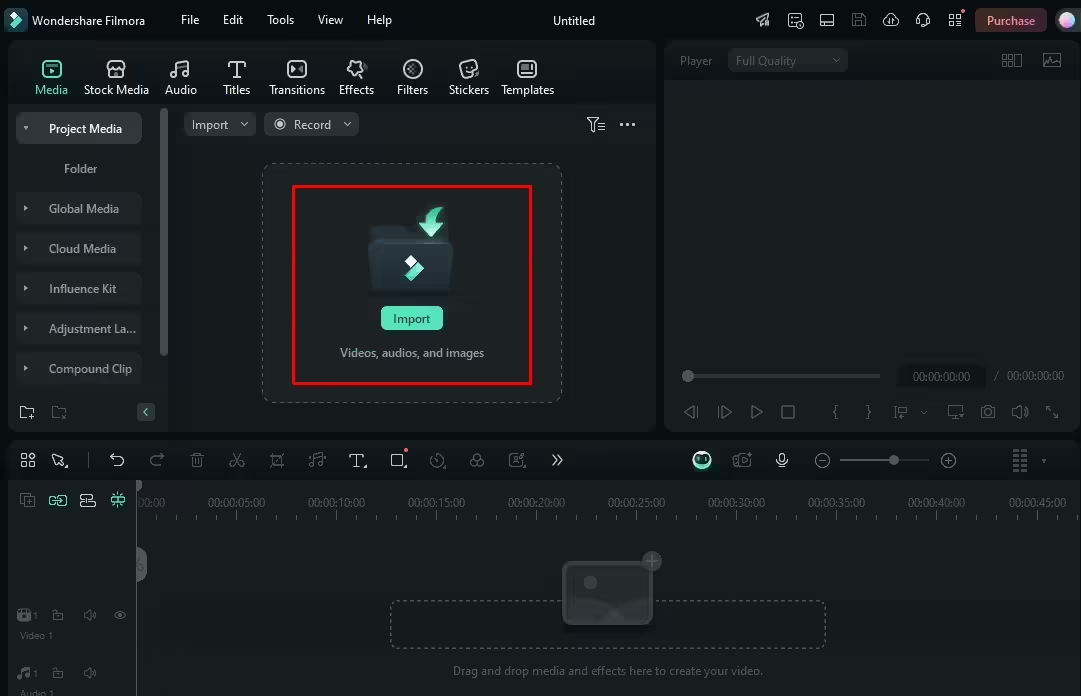
Step 2: After that, tap on the Import option to get your video into the tool for editing.
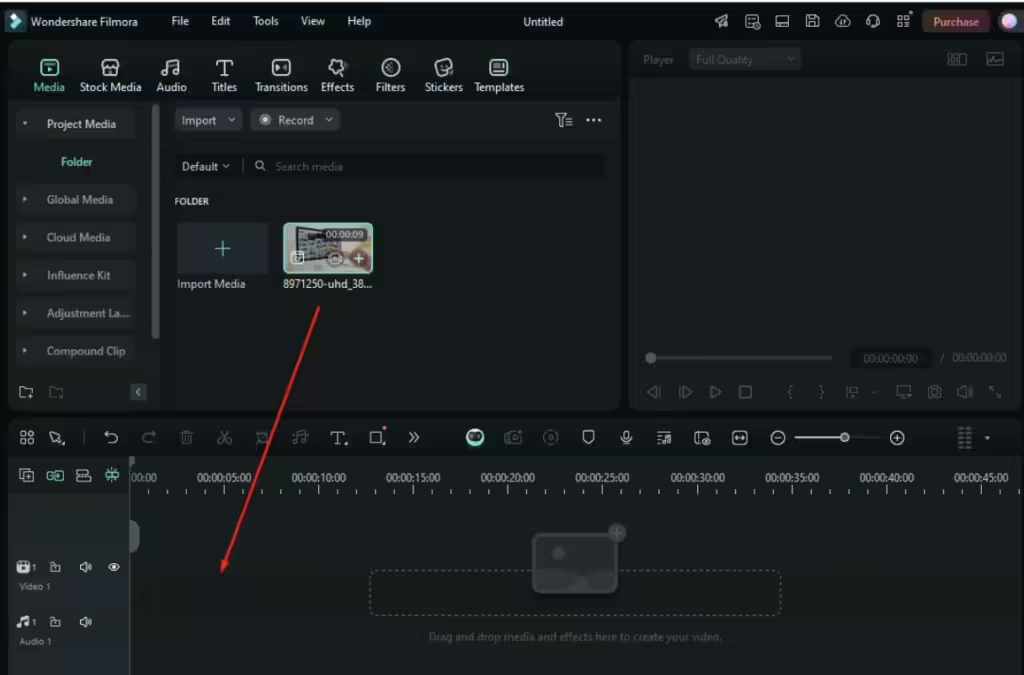
Step 3: Drag and drop the imported video into the timeline to make changes to it.
Step 4: Here, click on the video and navigate to AI Tools > Planar Tracking.
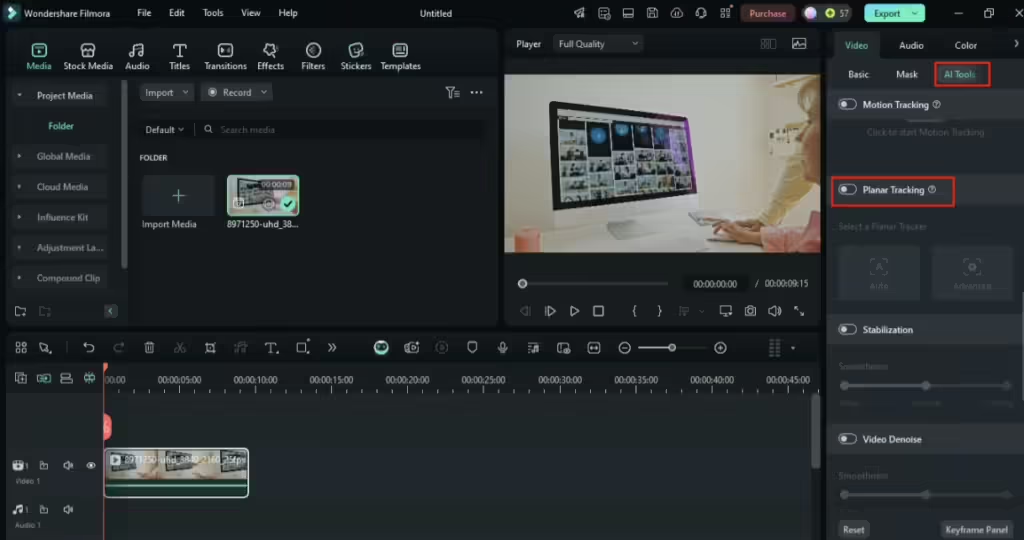
Step 5: After that, click on the Auto option.
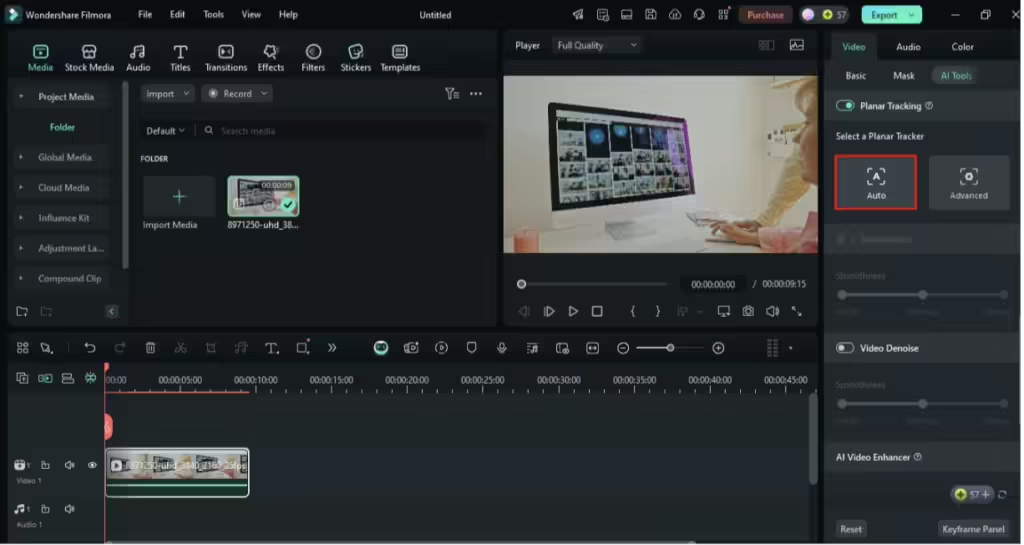
Step 6: Then, select the surface in the Preview section as shown in the image and tap on the Start option.
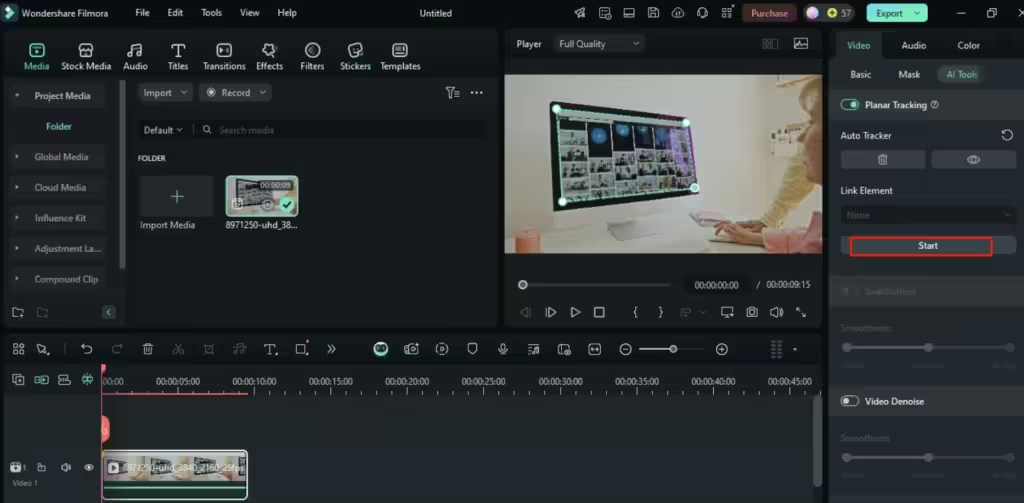
Step 7: After that, click on the Link Element option and select the Import form Computer to add an image to the tracked surface.
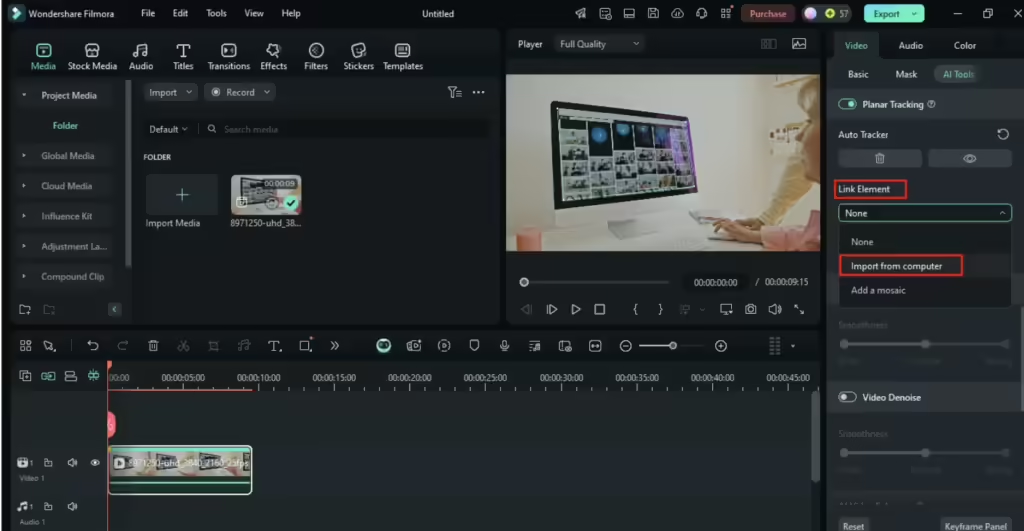
Step 8: However, if you want to use its Advanced Tracker option, click on it. Then you will see the 4-point tracking in the Preview section. Select the surface you need to make changes. Once you are done, go to the Analyze option and click on the Forward button.
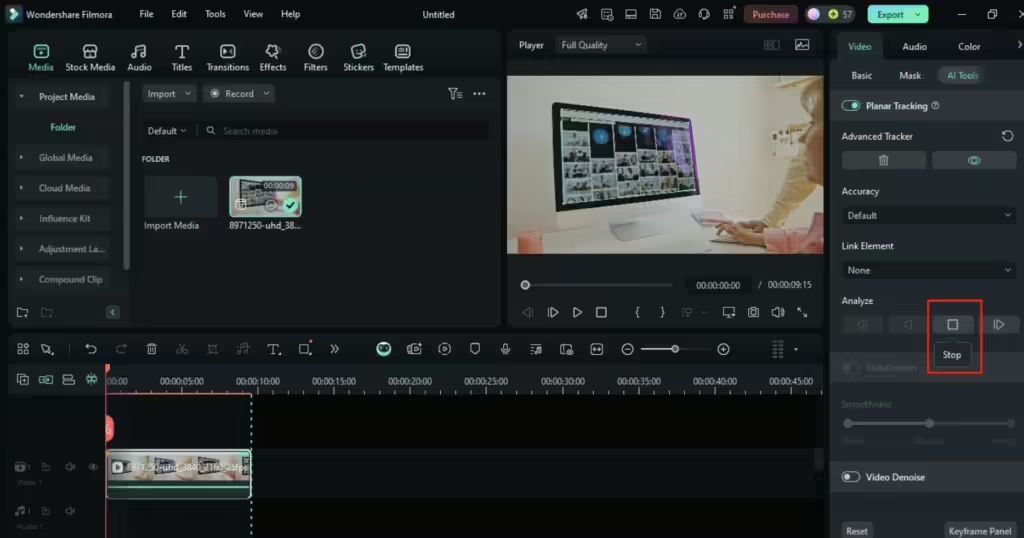
Note: You can pause the tracking while analyzing it adjust the frame where it is required, and start it again.
Step 9: Once analyzing is done, navigate to the Link Element option and select Add a Mosaic.
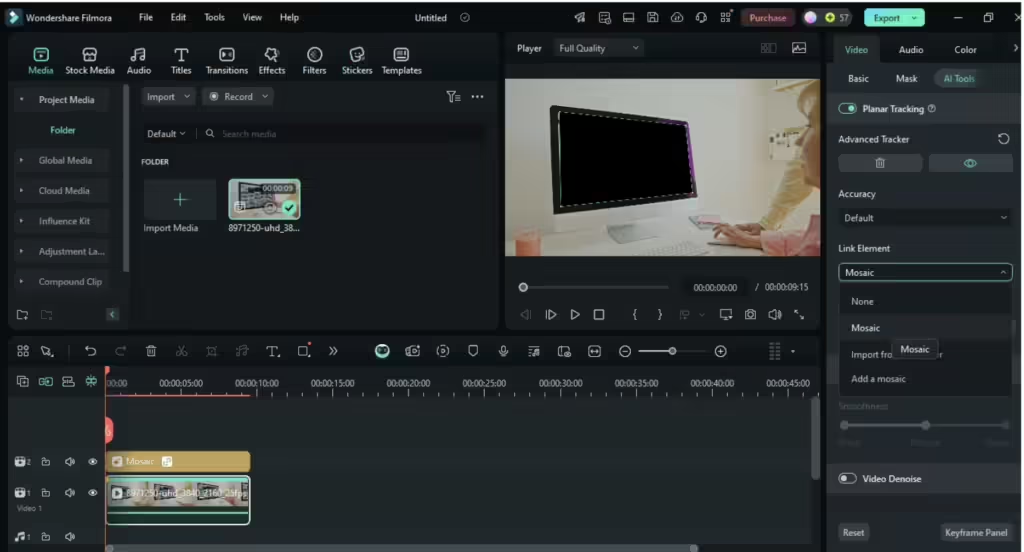
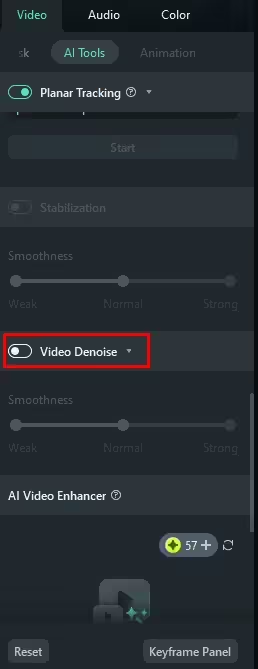
Step 10: If your video has background noise, then you can denoise it by clicking on the Video Denoise option that appears below the Planar Tracker option.
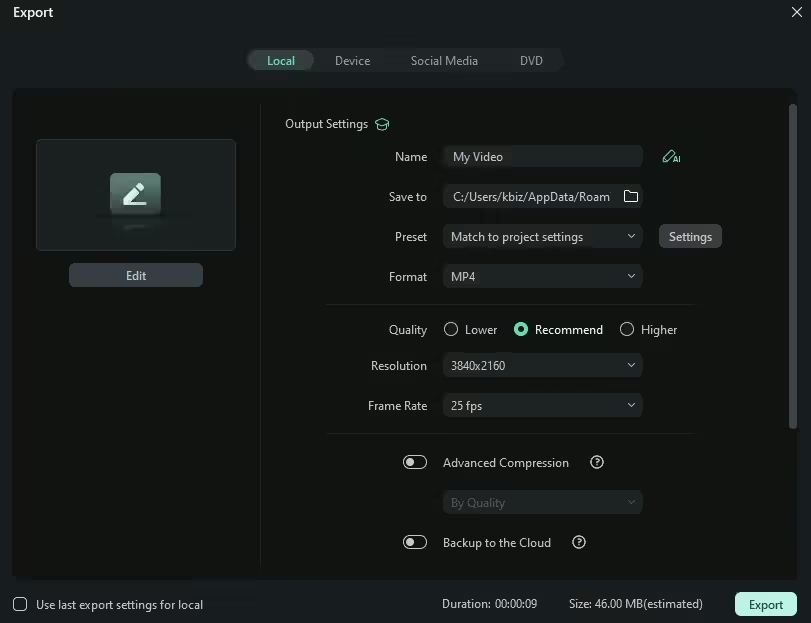
Step 11: Once you are done with your editing, tap on the Export option that appears at the top right corner.
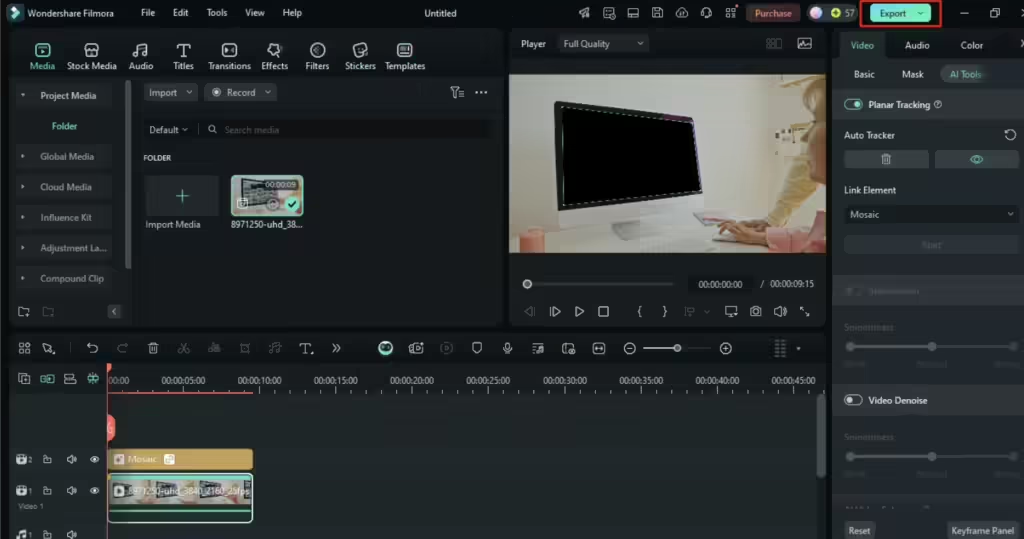
Sep 12: Further, a pop-up window will appear. To finalize the changes, click on the Export option again.
Conclusion
One of Wondershare Filmora’s best features is the planar tracker, which can take your video projects to the next level. As you use this guide and comprehend what it enables you to detect concerning flat shapes within your videos, you can easily control them. This makes the planar tracker perfect when using dynamic text overlays, object replacement, and special effects.
So, why wait? Discover the exciting world of video editing and perform creatively with Filmora’s Planar Tracker!
FAQs
- What is the difference between motion tracking and planar tracking in Filmora?
In Wondershare Filmora, there is motion tracking for following the movement of objects, whereas planar tracking is for following the movements of flat surfaces.
- Do I need advanced video editing skills to use the Planar Tracker in Filmora?
No, there is no need for advanced skills to use Wondershare Filmora’s planar tracker, as they provide a step-by-step guide on their official website.
- Can I use the planar tracker in Wondershare Filmora for free?
Yes, Wondershare Filmora offers its free version to its users.
