Introduced in Docker Desktop 4.18, the new docker init CLI generates Docker assets for projects, making creating Docker images and containers easier. When you run the docker init command in your project directory, it will guide you through creating the necessary files for your project with sensible defaults. These files include:
- .dockerignore
- Dockerfile
- docker-compose.yaml
The docker init command also allows you to choose the application platform that your project uses and the relative directory of your main package.
In this blog post, we will walk through the process of creating a simple web application using Rust, leveraging the power of the Warp framework and the Tokio asynchronous runtime. We will also utilize Docker to containerize our application, making it easy to deploy and manage. By the end of this guide, you will have a fully functional Rust web application running in a Docker container.
Prerequisites
Before we begin, ensure that you have Docker Desktop version 4.18 or above installed on your machine. This will allow us to use Docker’s features effectively.
Step 1: Setting Up the Project
First, we need to clone the repository that contains our sample application. Open your terminal and run the following commands:
git clone https://github.com/dockersamples/docker-init-demos
cd docker-init-demos/rust
Next, we will be running cargo init. This initializes a new Rust project in the current directory. It creates a Cargo.toml file, which is the manifest file that describes the project, its dependencies, and other metadata. Additionally, it sets up a src directory with a main.rs file for your project’s main code.
cargo init
cargo build --release
The cargo build --release builds the project in release mode, which applies optimizations to improve performance. The compiled binary will be located in the target/release directory. Note that builds in release mode are slower because of these optimizations, but they result in a faster, more efficient executable.
This will create a new Rust project and build it in release mode.
Step 2: Running Docker Init
Next, we will use the Docker Init CLI to generate the necessary Docker files for our project. Run the following command:
docker init
You will see a welcome message from the Docker Init CLI, guiding you through the setup process. You may encounter a warning indicating that some Docker files already exist. When prompted, choose to overwrite them. Here’s a sample interaction:
Welcome to the Docker Init CLI!

This utility will walk you through creating the following files with sensible defaults for your project:
  - .dockerignore
  - Dockerfile
  - compose.yaml

WARNING: The following Docker files already exist in this directory:
  - .dockerignore

? Do you want to overwrite them? Yes
? What application platform does your project use? Rust
? What version of Rust do you want to use? 1.70.0
? What port does your server listen on? 3030

CREATED: .dockerignore
CREATED: Dockerfile
CREATED: compose.yaml

✔ Your Docker files are ready!
Once the files are created, you can review them and make any necessary adjustments. When you’re ready, start your application by running:
docker compose up --build
Step 3: Running Docker Compose
To run your application in the background, execute the following command:
docker compose up -d --build
This command will build your Docker images and start the containers defined in your compose.yaml file.
Step 4: Accessing the Application
Once your application is running, you can access it in your web browser. Open your browser and navigate to:
http://localhost:3030
You should see a friendly message from Docker, confirming that your application is up and running:
.

## ##        ==

## ## ## ##    ===

/""""""""""""""""___/ ===

{                       /  ===-

______ O           __/

\    \         __/

_____/


Hello from Docker!
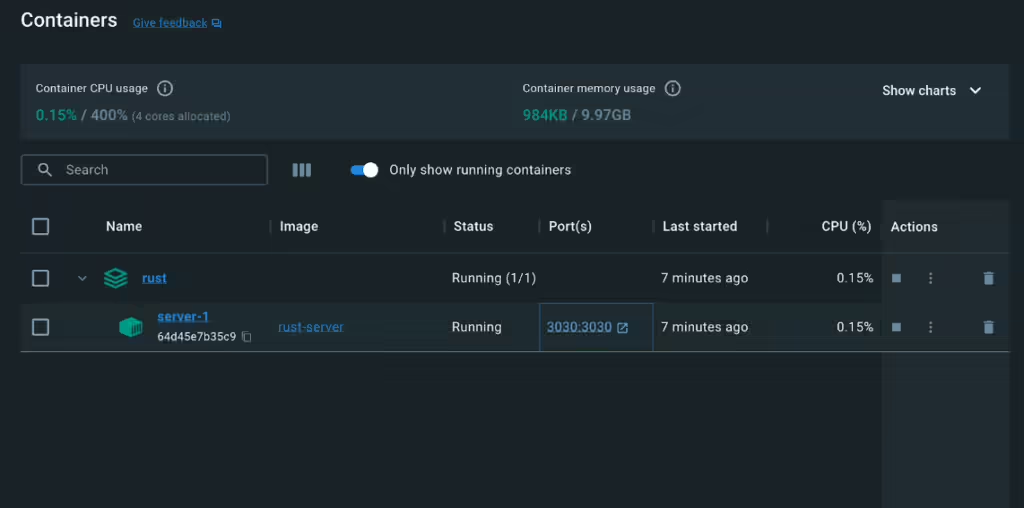
Step 5: Viewing It on Docker Desktop Dashboard

Conclusion
In this blog post, we successfully created a simple web application using Rust, Warp, and Tokio, and containerized it with Docker. This setup not only simplifies deployment but also enhances the scalability and maintainability of your application. Feel free to explore further by adding more features to your Rust application or experimenting with different Docker configurations. Happy coding!
