
About to reset your Docker Desktop, move to a new machine, or accidentally nuked your setup entirely? Below, we’re going hands-on with Docker Desktop data backups and everything you need to know to keep your containers and volumes safe. And hey, if you’re already in damage control mode, we’ll also cover what you can do to recover lost folders and deleted files – even if things look permanently gone.
Docker Basics Refresher
There are countless posts on Stack Overflow that show how many people trip over Docker’s fundamentals early on. And when it comes to data storage, those small misunderstandings can lead to big headaches. So let’s clear it up.
- Docker containers are basically lightweight, self-contained environments where your apps run. Think of them like disposable hotel rooms – nice and functional, but nothing sticks once you check out. That’s why Docker uses volumes to handle persistent data. Volumes are the actual “hard drives” where long-term stuff lives: your databases, app logs, or uploaded files.
- Then there are images. These are more like blueprints – a snapshot of your app and its environment. When you start a container, you launch it from an image. But unless you specifically mount a volume, any data your container writes is going straight into a temporary space. Shut it down or delete it, and it’s gone.
This setup is great for clean, repeatable deployments – but it also means it’s super easy to lose data if you’re not careful.
So before we talk about backups, know this: volumes are your lifeline. Containers and images can be rebuilt. Volumes? If they’re gone and you didn’t back them up, you’re going to wish you had.
How to Back Up Docker Desktop Data
Backups aren’t something you want to leave until “later.” Whether you’re running one container or twenty, a proper docker container backup strategy can save you from major headaches. And no, just having an image of your app isn’t enough – if your container writes to a volume and that volume disappears, so does your data.
Luckily, Docker gives you a few different ways to handle backups:
Method 1: Use Docker CLI
If you’re comfortable in the terminal – or at least not afraid of a little copy-paste – the Docker CLI gives you full control over your backup process. It’s not flashy, but it works. Here’s how to handle a docker container backup using nothing but commands:
First, let’s talk images:
If your container setup is working the way you want, you can freeze it by turning it into an image:
docker commit <container-name> my-backup-image This saves the container’s current state – including any file system changes – into a new image. It’s kind of like taking a snapshot, but keep in mind: this won’t include data stored in volumes. So if your app saves data to a volume (like most databases do), you’ll need to back that up separately.
For images you want to store locally, run:
docker image save -o my-app-backup.tar my-backup-image This creates a .tar file you can stash anywhere – USB, cloud, external drive, whatever you trust.
Now, for volumes:
Docker stores volume data on your local file system, and you can back it up using a temporary container that mounts the volume and exports it as a tarball:
docker run --rm --volumes-from my-container -v $(pwd):/backup ubuntu tar cvf /backup/volume-backup.tar /path/in/containerThat grabs everything from the volume and saves it as a .tar file in your current folder. Later, you can restore with:
docker image load -i my-backup.tar And unpack the volume archive into a new container.
It’s all-manual, but solid – if you know what you’re doing. One typo, and you’re backing up the wrong thing – or nothing at all. So double-check paths, volume names, and container IDs before hitting Enter.
Method 2: Use Docker Hub or Private Registries
If you’d rather keep things backed up in the cloud – or need to share containers across machines or with teammates – Docker Hub or a private registry is the way to go.
Once you’ve committed your container to an image:
docker commit <container-name> my-backup-image You can push it to Docker Hub (or another registry):
docker tag my-backup-image username/my-backup-image:latest
docker push username/my-backup-image:latest
Make sure your repo is set to private if the image contains anything sensitive. This method won’t cover volume data, though – just the container image.
To keep everything synced, many devs also back up volume contents manually and store the resulting .tar files in a private repo, cloud storage, or alongside project files in version control (if small enough).
To restore from Docker Hub:
docker pull username/my-backup-image:latest Then run it like any normal image. Easy, portable, and no USB drives involved.
Method 3: Use Extensions (GUI Option)
If you prefer a visual, no-terminal-needed approach, Docker Desktop extensions make backups easy.
The Volumes Backup & Share extension, which you can find on official Docker Hub, lets you back up volumes as local files, Docker images, or push them directly to a registry like Docker Hub. Just a few clicks – no scripts required.
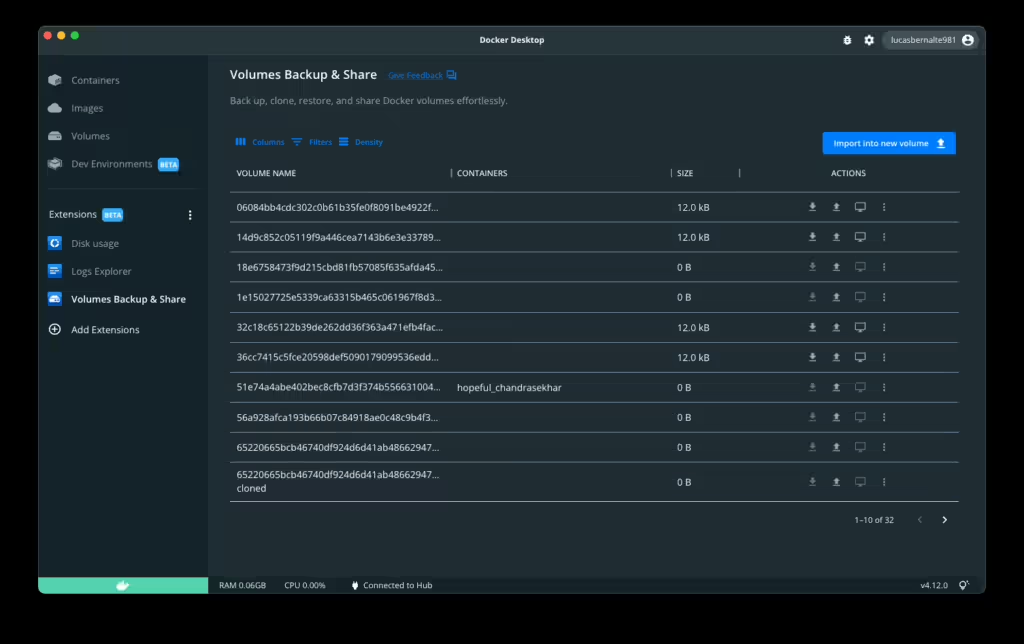
Restoring is just as simple: select your backup, pick a volume, and the extension does the rest. It even pauses containers to avoid data issues.
For quick volume backups, this GUI option is hard to beat.
What If You Didn’t Back Up?
Now let’s talk about what to do If you haven’t backed up. It’s easy to assume Docker’s taking care of everything behind the scenes – until a container vanishes or a volume gets deleted.
Here’s the deal: if you deleted a container but didn’t use volumes, you’ve probably lost everything inside it. But if you were using volumes and they were removed or your disk got wiped, all hope isn’t lost – yet.
This is where expert-reviewed data recovery software can save your day. Even if a Docker volume or container folder is deleted, the data might still be sitting on your drive – it’s just marked as “free space” and no longer visible to your OS. Recovery tools like Disk Drill (Windows & Mac) or R-Studio (Windows, macOS, Linux) are designed to recover deleted files on a PC. They can scan your drive for recoverable data and help restore it before it’s permanently lost. They don’t rely on the current “visible” file structure – they look for traces of deleted files directly on the disk.
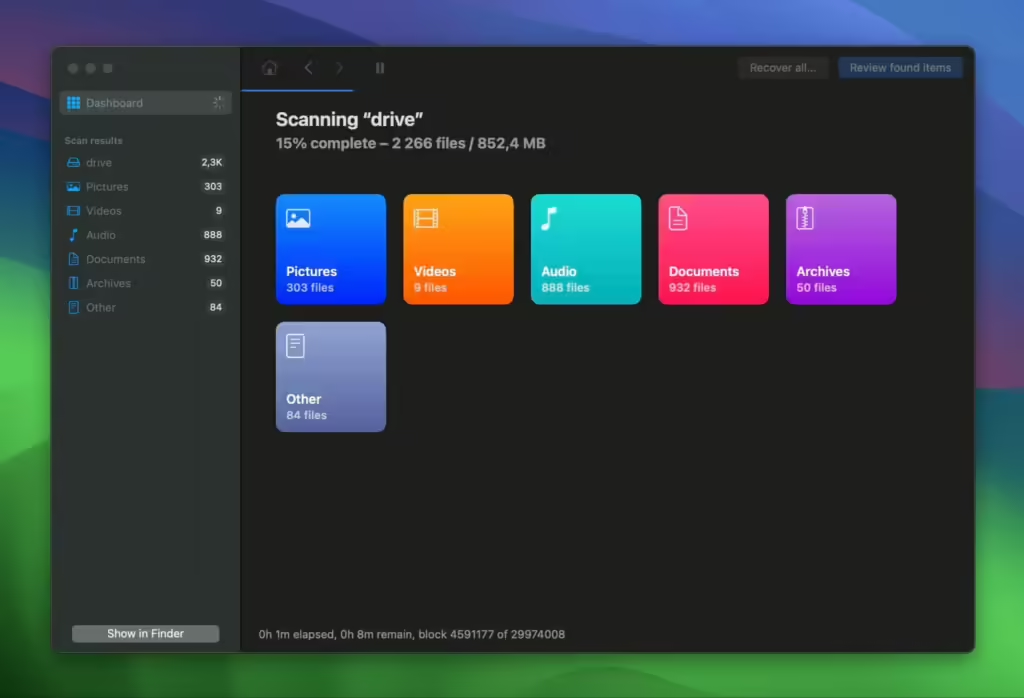
To do that, they need to understand the file system your machine uses – like ext4, APFS, HFS+, or NTFS. That allows them to recognize how files were organized and, in many cases, recover permanently deleted folder paths (If the original structure is intact) and the files inside them.
Even if the folder name is lost, data recovery software can still identify file types and rebuild what they can based on signatures and known formats.
These tools typically scan entire drives or individual partitions, and when possible, they’ll show you files in their original directories.
- On macOS, Docker Desktop config files live at ~/Library/Containers/com.docker.docker/, but actual volume data is stored inside a virtual machine disk. To access or recover that data, you may need to mount or extract the VM’s internal ext4 partition rather than scanning this folder directly.
- On Windows with Docker Desktop using WSL2, volume data resides in a virtual ext4 disk located in C:\Users\<user>\AppData\Local\Docker\wsl\data. You can’t simply scan that folder as you would a regular NTFS directory. Instead, you may need to mount or convert the virtual disk (VHDX) before running a recovery tool.
Once you run the scan, you might be surprised by what shows up – log files, SQLite databases, even entire app folders. If nothing’s overwritten that space yet, there’s a real chance to get your data back.
While there are no 100% guarantees, here are a few simple things to remember that can stack the odds in your favor:
- Use the drive where the deleted data was stored as little as possible. That means no writing, no downloading, no installing new tools to the same drive. Every new file increases the chance of overwriting the exact sectors your lost data is sitting in. If possible, plug the drive into another machine and scan it from there.
- And whatever you do – don’t reinstall Docker or run cleanup commands until you’ve tried recovery. Your data might still be there. But every action you take makes it harder to get it back.
Video Guide
Final Thoughts
The bottom line: we cannot stress enough how critical it is to back up your Docker data – containers, images, volumes, all of it. Docker makes it easy to spin things up, but just as easy to lose them if you’re not careful.
Whether you’re experimenting with a new setup or moving to another machine, a backup can be the difference between a smooth transition and a total meltdown. And if you didn’t back up in time? Tools like Disk Drill or R-Studio can still help you recover permanently deleted folders or recover deleted files on PC – but only if you act quickly.
Ever had to recover Docker data the hard way? Or maybe you’ve got your own backup strategy? Share your experience in the comments below!