
As workloads in a Kubernetes cluster change, keeping resources available can be a big challenge. That’s where the Kubernetes Cluster Autoscaler comes in. It’s an important tool that automatically adjusts the number of nodes in your cluster based on demand. It scales up when you need more resources and scales down when you don’t. This feature helps your cluster stay agile, respond quickly to workload changes, and save costs.
Auto-scaling is essential for any cloud-based infrastructure today. With auto-scaling enabled, you can make the most of your resources, cut costs by only using what you need, and better manage workloads, especially during busy times or when demand fluctuates. Whether you’re facing sudden spikes in traffic or slow periods, the Cluster Autoscaler helps keep a good balance between performance and cost.

This guide will demonstrate how to set up and configure the Kubernetes Cluster Autoscaler.
Pre-requisites
Before you can configure the Kubernetes Cluster Autoscaler, there are some essential prerequisites to ensure a smooth setup process and proper functionality in your environment.
1. Kubernetes Cluster Setup
First, you need a working Kubernetes cluster. While Kubernetes can be deployed in different environments, it’s best to have your cluster running on a cloud provider like AWS, Google Cloud Platform (GCP), or Microsoft Azure, as autoscaling integrates well with their infrastructure. These providers allow the Cluster Autoscaler to work with instance groups, dynamically adding or removing nodes as needed.
Make sure your cluster is healthy and operational. You can check the status of your nodes with this command:
kubectl get nodes
2. Access to Kubernetes Control Plane
Next, confirm that you have access to the Kubernetes control plane. You should be able to use the kubectl command-line tool to interact with your cluster, allowing you to configure and monitor various components, including the Cluster Autoscaler.
To verify your access, run a simple command like:
kubectl get pods --all-namespaces
If you don’t have the kubectl tool installed, you can follow the official Kubernetes installation guide for setup. Additionally, ensure you have the necessary permissions, possibly requiring cluster-admin access, to install and configure the Cluster Autoscaler.
3. Cloud Provider-Specific Setup
Depending on your cloud provider, there are some specific configurations to complete before enabling the Cluster Autoscaler.
- AWS (Amazon Web Services):
- Create or modify IAM roles that allow the Cluster Autoscaler to manage EC2 instances. The IAM role associated with your worker nodes should have permissions like
autoscaling:DescribeAutoScalingGroupsandautoscaling:SetDesiredCapacity. Also, ensure your node groups have the correct scaling limits.
- Create or modify IAM roles that allow the Cluster Autoscaler to manage EC2 instances. The IAM role associated with your worker nodes should have permissions like
- GCP (Google Cloud Platform):
- Set up a service account with the necessary permissions for the Cluster Autoscaler to interact with your instance groups. Make sure the GKE cluster is configured with autoscaling enabled in the node pool settings. The service account should have roles like
roles/container.clusterAutoscaler.
- Set up a service account with the necessary permissions for the Cluster Autoscaler to interact with your instance groups. Make sure the GKE cluster is configured with autoscaling enabled in the node pool settings. The service account should have roles like
- Azure (Microsoft Azure):
- Ensure the Azure Kubernetes Service (AKS) is configured with the right scaling settings. AKS requires autoscaler-enabled virtual machine scale sets (VMSS) and the appropriate role assignments to manage node scaling automatically.
Understanding Cluster Autoscaler
To effectively configure and manage the Cluster Autoscaler, it’s essential to understand how it works. The Cluster Autoscaler is designed to monitor resource demands in your Kubernetes cluster and dynamically adjust the number of nodes to maintain an optimal balance between resource availability and workload needs.
How Cluster Autoscaler Works
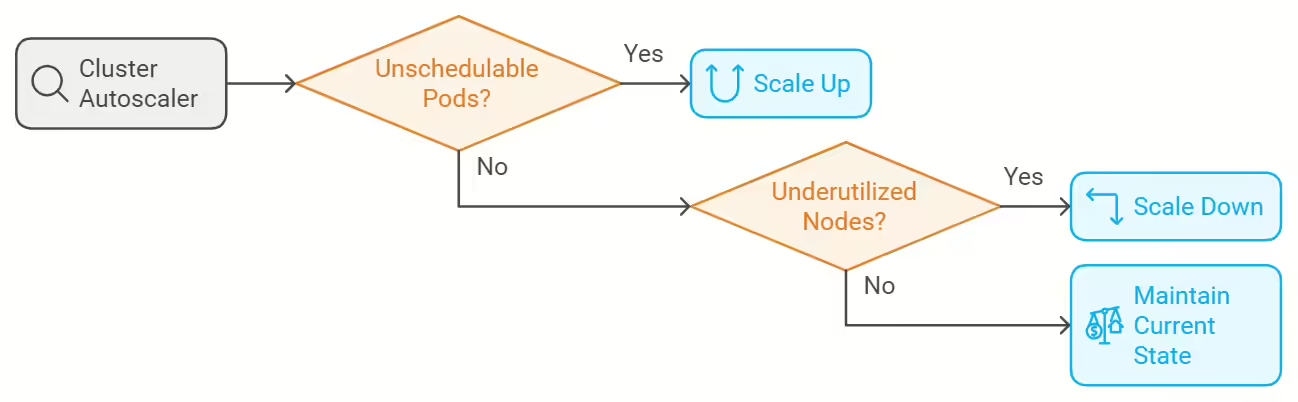
The Cluster Autoscaler continuously checks the resource requests of pods within the cluster. When it identifies unscheduled pods due to insufficient resources (like CPU or memory), it automatically adds more nodes to meet these demands. Conversely, when resources are underutilized, it removes unnecessary nodes to cut costs and free up resources.
At its core, the autoscaler operates based on two main functions:
- Scaling Up: This happens when new pods are created or existing ones need more resources than current nodes can provide. The Cluster Autoscaler assesses if more nodes are necessary and triggers the provisioning of new nodes to ensure that pending pods can be scheduled and run smoothly.
- Scaling Down: The autoscaler also identifies underutilized nodes. If nodes have no running pods or if pods can be shifted to other nodes, the autoscaler will remove these idle nodes to reduce resource consumption.
This ongoing cycle of scaling up and down helps keep the cluster efficient and cost-effective, adapting to changes in workload dynamically.
Scaling Up vs. Scaling Down
- Scaling Up:
- Triggered when there are pending pods that can’t be scheduled due to a lack of resources. The Cluster Autoscaler calculates how many additional nodes are needed and adds them to the cluster.
- Example: If a deployment increases its replicas but the current nodes can’t handle the extra pods, the autoscaler will add new nodes until sufficient resources are available.
- Scaling Down:
- Occurs when nodes are underutilized, meaning there are nodes running with no active pods or very few that could be rescheduled elsewhere. The autoscaler will remove these idle nodes from the cluster.
- Example: When traffic decreases or tasks complete, and some nodes have no active pods, the autoscaler will reduce the node count to optimize costs.
The scaling decisions are based on resource requests and utilization thresholds you set, ensuring the cluster responds to real-time demand without overprovisioning.
Cloud Provider Integration
The Cluster Autoscaler integrates closely with cloud providers to manage the underlying infrastructure dynamically:
- AWS Integration:
On AWS, the autoscaler works with Auto Scaling Groups (ASG). When scaling up, it increases the ASG’s desired instance count, prompting the cloud provider to provision additional EC2 instances. For scaling down, it adjusts the count downward, leading to the termination of idle instances.
- GCP Integration:
In GCP, the autoscaler interacts with Managed Instance Groups (MIGs) in Google Kubernetes Engine (GKE). When scaling up, it adds more VMs to the MIG. When scaling down, it removes VMs from the MIG if they’re not needed, ensuring efficient resource use.
- Azure Integration:
On Azure, the autoscaler integrates with Virtual Machine Scale Sets (VMSS) within Azure Kubernetes Service (AKS). The Cluster Autoscaler adjusts the number of VMs in the VMSS based on workload, provisioning or decommissioning nodes as necessary.
In each case, the Cluster Autoscaler ensures that nodes are added or removed according to the specific configuration and limitations of the cloud provider, making infrastructure management seamless and automated. This integration is crucial for allowing Kubernetes clusters to respond quickly and cost-efficiently to workload demands.
Installing Cluster Autoscaler
After confirming that your prerequisites are in place and understanding how the Cluster Autoscaler functions, the next step is to install and configure it for your Kubernetes cluster. You can install the Cluster Autoscaler using either kubectl or Helm, based on your preference. Below is a step-by-step guide to help you install and configure the Cluster Autoscaler.
Step-by-Step Installation Guide
The simplest way to install the Cluster Autoscaler is by applying the official manifest file with kubectl. This manifest configures the autoscaler for your specific cloud provider.
For AWS, use the following command to install the Cluster Autoscaler:
kubectl apply -f https://raw.githubusercontent.com/kubernetes/autoscaler/master/cluster-autoscaler/cloudprovider/aws/examples/cluster-autoscaler-autodiscover.yaml
Make sure to substitute the manifest URL with the appropriate one for your cloud provider (like GCP or Azure). You can find the provider-specific installation details on the Kubernetes Autoscaler GitHub repository.
Alternatively, you can use Helm for installation:
helm repo add autoscaler https://kubernetes.github.io/autoscaler
helm repo update
helm install cluster-autoscaler autoscaler/cluster-autoscaler --namespace kube-system
This command installs the Cluster Autoscaler in the kube-system namespace, which is where Kubernetes system components are typically located.
Configuring Autoscaler Parameters
After installing the Cluster Autoscaler, you’ll need to configure its key parameters. These settings determine how the autoscaler behaves, including the minimum and maximum number of nodes allowed and scaling thresholds.
Here are some important parameters to configure:
--nodes=<min>:<max>: Defines the minimum and maximum number of nodes in the cluster. For example,--nodes=1:10means the cluster will scale between 1 and 10 nodes.--balance-similar-node-groups: Ensures a balanced distribution of nodes across similar node groups, helping to maintain resource allocation across availability zones or regions.--skip-nodes-with-system-pods=false: By default, the autoscaler skips nodes that have critical system pods running. Set this tofalseif you want the autoscaler to consider these nodes for scaling.--scale-down-utilization-threshold: Controls the threshold for scaling down nodes. For instance, setting it to0.5means nodes using less than 50% of their resources might be scaled down.
An example configuration for the Cluster Autoscaler in your manifest or Helm values might look like this:
        - --cloud-provider=aws
        - --nodes=1:10
        - --balance-similar-node-groups
        - --scale-down-utilization-threshold=0.5
        - --skip-nodes-with-local-storage=false
        - --skip-nodes-with-system-pods=true
These settings define how the Cluster Autoscaler manages nodes and determines scaling behavior based on your cluster’s needs.
Verifying Installation
After installing and configuring the Cluster Autoscaler, it’s crucial to verify that it’s functioning correctly. Use the following command to check that the Cluster Autoscaler pod is running in the kube-system namespace:
kubectl get pods -n kube-system
You should see the Cluster Autoscaler pod listed with a status of Running. To further verify its operation, check the logs of the Cluster Autoscaler pod:
kubectl logs -f <cluster-autoscaler-pod-name> -n kube-system
Following these steps will result in a functional Cluster Autoscaler configured to manage node scaling in your Kubernetes cluster based on real-time resource demands.
Configuring Cluster Autoscaler for a Cloud Provider
After installing the Cluster Autoscaler, you need to configure it specifically for your cloud provider to ensure it operates effectively.
AWS Setup
- Configure IAM Roles and Policies:
- Create an IAM role for the Cluster Autoscaler to manage EC2 instances with the following policies:
AmazonEKSClusterAutoscalerPolicy- Custom policies allowing actions such as:
{ "Effect": "Allow", "Action": [ "autoscaling:DescribeAutoScalingGroups", "autoscaling:DescribeAutoScalingInstances", "autoscaling:SetDesiredCapacity", "ec2:DescribeInstances", "ec2:DescribeTags" ], "Resource": "*" } - Modify Instance Groups:
- Ensure your Amazon EC2 Auto Scaling Groups (ASGs) are configured for dynamic scaling. Set appropriate minimum and maximum sizes based on workload expectations.
- Tag each ASG with
kubernetes.io/cluster/<CLUSTER_NAME>and valueownedto let the Cluster Autoscaler identify manageable ASGs.
- Add Cluster Autoscaler Configuration:
- Update the Cluster Autoscaler deployment with the following arguments:
- --cloud-provider=aws
- --nodes=1:10:<YOUR_ASG_NAME>
- --balance-similar-node-groups
GCP Setup
- Set Up Service Accounts:
- Create a service account in GCP with permissions to manage Kubernetes resources:
gcloud iam service-accounts create cluster-autoscaler \ --display-name "Cluster Autoscaler Service Account"- Assign roles like
roles/container.clusterViewer,roles/container.clusterAdmin, androles/compute.instanceAdmin.v1to this service account.
- Configure GKE Node Pools:
- Ensure node pools are configured for autoscaling. Enable the “Enable autoscaling” option with set minimum and maximum node counts.
- Tag instance groups with
kubernetes.io/cluster/<CLUSTER_NAME>for the Cluster Autoscaler to manage them.
- Add Cluster Autoscaler Configuration:
- Include appropriate flags in the Cluster Autoscaler deployment:
- --cloud-provider=gce
- --nodes=1:10:<YOUR_NODE_POOL_NAME>
- --balance-similar-node-groups
Azure Setup
- Configure AKS with VM Scale Sets:
- Ensure Azure Kubernetes Service (AKS) is set up with Virtual Machine Scale Sets (VMSS) for dynamic scaling.
- Assign Permissions:
- Assign necessary permissions to the AKS managed identity or service principal to manage VMSS instances. Grant the
Contributorrole for the resource group:
az role assignment create --assignee <SERVICE_PRINCIPAL_ID> \ --role "Contributor" --scope /subscriptions/<SUBSCRIPTION_ID>/resourceGroups/<RESOURCE_GROUP_NAME> - Assign necessary permissions to the AKS managed identity or service principal to manage VMSS instances. Grant the
- Add Cluster Autoscaler Configuration:
- Configure the Cluster Autoscaler with Azure-specific parameters in its deployment:
- --cloud-provider=azure
- --nodes=1:10:<YOUR_VMSS_NAME>
- --scale-down-unneeded-time=10m
- --scale-down-utilization-threshold=0.5
Testing Auto-Scaling in Action
Testing the functionality of the Cluster Autoscaler is essential to ensure it responds correctly to changing workloads. This section outlines how to create resource demands, monitor scaling events, and observe the autoscaler’s behavior during scaling down.
Creating Resource Demands
To test autoscaling, create a Kubernetes deployment with specific resource requests that will trigger scaling up. Follow these steps:
- Create a Deployment with Resource Requests:
Create a YAML file named
my-app-deployment.yaml:apiVersion: apps/v1 kind: Deployment metadata: name: my-app spec: replicas: 5 selector: matchLabels: app: my-app template: metadata: labels: app: my-app spec: containers: - name: my-app-container image: nginx # Replace with your app image resources: requests: memory: "512Mi" cpu: "500m"Apply the deployment using the following command:
kubectl apply -f my-app-deployment.yaml - Observe Scaling Up:
After applying the deployment, the Cluster Autoscaler should automatically provision new nodes if the current nodes lack capacity. Check the status of the nodes and pods:
kubectl get pods
kubectl get nodes
You should see new pods being scheduled and potentially additional nodes being added to the cluster.
Monitoring Scaling Events
Monitoring is key to understanding the autoscaler’s performance. Track scaling events by checking the logs of the Cluster Autoscaler:
kubectl logs -f deployment/cluster-autoscaler -n kube-system
Look for messages indicating that nodes are being added, such as:
I0915 12:34:56.789012 1 scale_up.go:200] Scale-up: setting group <ASG_NAME> size to <NEW_SIZE>
Using tools like Kubernetes Dashboard or Grafana can help visualize scaling events and resource utilization, providing insights into node counts and pod statuses.
Scaling Down
After testing scaling up, observe how the Cluster Autoscaler handles scaling down when workloads decrease:
- Reduce the Deployment Replicas:
Scale down the number of replicas in your deployment:
kubectl scale deployment my-app --replicas=1 - Observe Scaling Down:
The Cluster Autoscaler will check for idle resources and begin removing nodes if they are no longer needed. Check the logs to see the scaling down process:
kubectl logs -f deployment/cluster-autoscaler -n kube-systemLook for messages indicating nodes are being removed:
I0915 12:45:67.890123 1 scale_down.go:150] Scale-down: removing node <NODE_NAME> from group <ASG_NAME> - Final Verification:
Verify the state of your nodes:
kubectl get nodesYou should see that the number of nodes has decreased according to the scaling policies defined in your Cluster Autoscaler configuration.
Best Practices for Cluster Autoscaler
Implementing the Cluster Autoscaler effectively requires adherence to best practices to ensure efficient operation, monitoring, and resilience. Here are key strategies to optimize your autoscaling setup.
Efficient Resource Allocation
- Right-Sizing Resource Requests:
Ensure resource requests in your deployments accurately reflect application needs. Overestimation can lead to unnecessary scaling, while underestimation can cause performance issues.
- Use Vertical Pod Autoscaler (VPA):
Integrate the Vertical Pod Autoscaler with Cluster Autoscaler. VPA automatically adjusts CPU and memory requests based on historical usage, optimizing resource allocation over time.
- Avoid Overprovisioning:
Set reasonable limits on minimum and maximum node counts in your Cluster Autoscaler configuration to prevent overspending and ensure scaling occurs only when necessary.
- Regularly Review Resource Usage:
Periodically analyze resource usage and adjust deployments’ requests and limits based on actual workloads, maintaining a lean and efficient cluster.
Monitoring and Alerts
- Set Up Monitoring Tools:
Use tools like Prometheus and Grafana to track cluster performance. Prometheus scrapes metrics, while Grafana visualizes this data in dashboards. Install them using Helm:
helm install prometheus prometheus-community/prometheus helm install grafana grafana/grafana - Create Alerts:
Configure alerts for critical metrics related to resource usage and node health. For instance, set alerts for high CPU or memory utilization.
Example Prometheus alert rule:
groups: - name: autoscaler-alerts rules: - alert: HighCPUUtilization expr: avg(rate(container_cpu_usage_seconds_total{image!=""}[5m])) by (pod) > 0.8 for: 5m labels: severity: critical annotations: summary: "High CPU utilization detected on {{ $labels.pod }}" description: "CPU usage has been over 80% for the last 5 minutes." - Dashboard Visualization:
Create Grafana dashboards to visualize key metrics like node counts, pod statuses, and resource utilization, helping quickly identify scaling trends and potential issues.
Handling Node Failures
- Implement Node Health Checks:
Configure health checks for your nodes to promptly identify and remove unresponsive or unhealthy nodes. Use Kubernetes readiness and liveness probes for this.
- Enable Automatic Node Replacement:
Utilize cloud provider features for automatic replacement of unhealthy nodes. Managed node groups in AWS and GCP can replace failed instances automatically.
- Utilize Pod Disruption Budgets (PDBs):
Define PDBs for critical workloads to ensure a minimum number of pods remain available during scaling or maintenance. This helps maintain service availability during scaling events.
Example PDB configuration:
apiVersion: policy/v1beta1 kind: PodDisruptionBudget metadata: name: my-app-pdb spec: minAvailable: 1 selector: matchLabels: app: my-app - Regularly Test Node Failures:
Conduct chaos engineering practices to simulate node failures and evaluate your cluster’s resiliency, identifying weaknesses and improving overall stability.
By following these best practices, you can enhance the efficiency, reliability, and responsiveness of your Cluster Autoscaler setup, ensuring your Kubernetes cluster is well-optimized for changing workloads while maintaining high availability and performance.