
We all know Kubernetes as a powerful container orchestration tool that enables efficient management of containerized applications. You can integrate Kubernetes with cloud providers, such as AWS, you can leverage scalable infrastructure and automate the deployment of your applications across multiple environments.
This tutorial will explain how to integrate Kubernetes with AWS, including setting up your AWS environment, configuring the Kubernetes cluster, and deploying applications on AWS. This is the first part of a series covering integration with major cloud providers.
Prerequisites
Before you begin:
- An AWS account, with administrative access to create IAM roles, VPCs, and other resources.
- A Kubernetes cluster installed locally or on your preferred infrastructure.
- The AWS CLI installed and configured with your AWS account credentials.
- kubectl installed for managing your Kubernetes cluster.
Step 1: Set Up AWS Environment
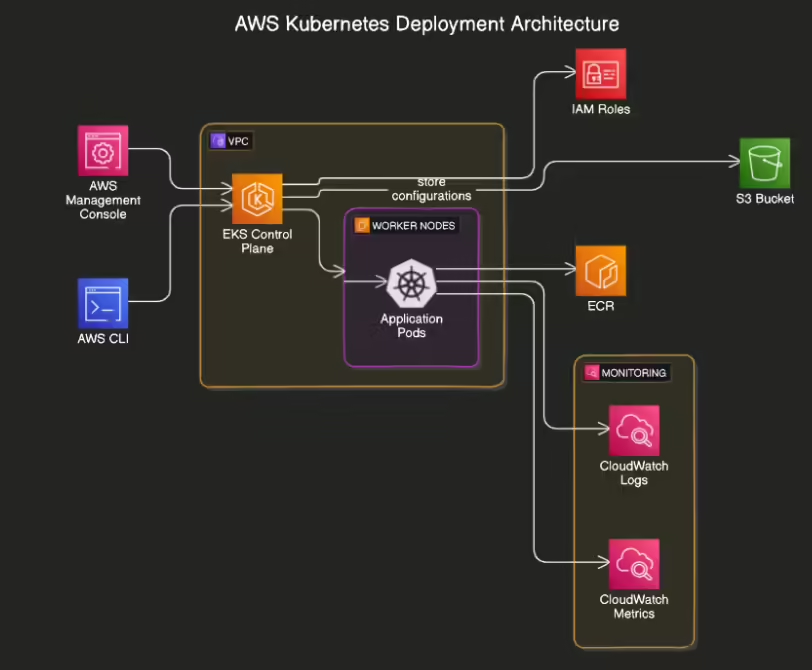
To integrate Kubernetes with AWS, you need to configure a few key AWS resources: VPC, subnets, and IAM roles.
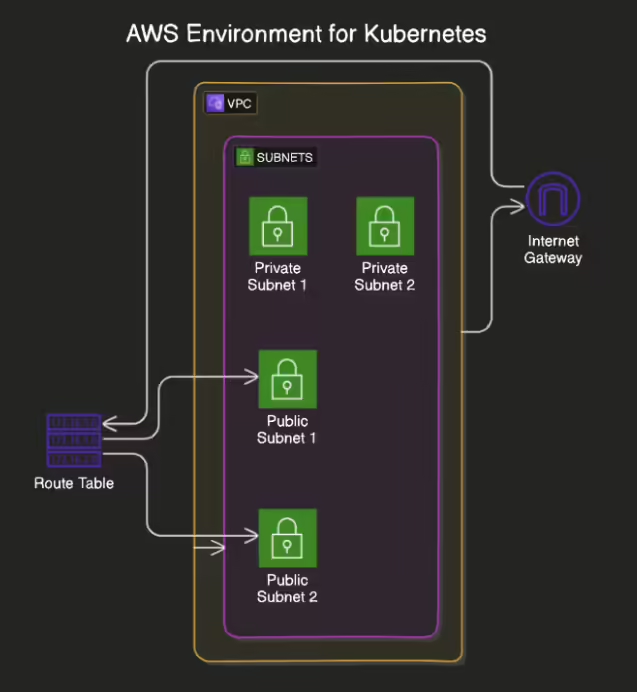
1.1 Create a VPC
The first step is to create a Virtual Private Cloud (VPC) to host your Kubernetes resources.
- Log in to your AWS account and navigate to the VPC Dashboard.
- Select Create VPC.
- Name your VPC, e.g.,
kubernetes-vpc. - Choose an IPv4 CIDR block, e.g.,
10.0.0.0/16. - Enable DNS support and DNS hostnames for the VPC.
- Create the VPC.
aws ec2 create-vpc --cidr-block 10.0.0.0/161.2 Create Subnets
Next, create subnets for your Kubernetes nodes within the VPC.
- Navigate to the Subnets section and select Create Subnet.
- Create a public subnet in a specific availability zone, e.g.,
10.0.1.0/24inus-east-1a. - Repeat for additional subnets as required, both public and private.
aws ec2 create-subnet --vpc-id VPC_ID --cidr-block 10.0.1.0/24 --availability-zone us-east-1a1.3 Configure an Internet Gateway
Kubernetes requires internet access for pulling container images from public registries.
- In the VPC Dashboard, select Internet Gateways and click Create Internet Gateway.
- Attach the Internet Gateway to your VPC.
aws ec2 create-internet-gateway
aws ec2 attach-internet-gateway --vpc-id VPC_ID --internet-gateway-id IGW_ID
1.4 Update Route Tables
To allow internet traffic, modify the route tables.
- Navigate to Route Tables and create a new route table for public subnets.
- Add a route that directs all outbound traffic (
0.0.0.0/0) to the Internet Gateway. - Associate the route table with your public subnets.
aws ec2 create-route-table --vpc-id VPC_ID
aws ec2 create-route --route-table-id RTB_ID --destination-cidr-block 0.0.0.0/0 --gateway-id IGW_ID
Step 2: Set Up IAM Roles for Kubernetes
Kubernetes on AWS requires IAM roles to manage permissions for various resources.
2.1 Create an IAM Role for Kubernetes Nodes
- In the IAM Dashboard, select Roles and click Create Role.
- Choose EC2 as the trusted entity, then select Next.
- Attach the following policies to grant necessary permissions:
- AmazonEC2FullAccess
- AmazonS3ReadOnlyAccess
- AmazonEKSWorkerNodePolicy (for managed EKS clusters)
- Name the role, e.g.,
kubernetes-node-role.
aws iam create-role --role-name kubernetes-node-role --assume-role-policy-document file://ec2-trust-policy.json
aws iam attach-role-policy --role-name kubernetes-node-role --policy-arn arn:aws:iam::aws:policy/AmazonEC2FullAccess
2.2 Create an IAM Role for Kubernetes Control Plane (EKS)
If you are using Amazon EKS, create a role for the control plane.
- Follow similar steps to create a role named
eks-cluster-role. - Attach the
AmazonEKSClusterPolicyandAmazonEKSServicePolicy.
aws iam create-role --role-name eks-cluster-role --assume-role-policy-document file://eks-trust-policy.json
aws iam attach-role-policy --role-name eks-cluster-role --policy-arn arn:aws:iam::aws:policy/AmazonEKSClusterPolicy
Step 3: Configure Kubernetes on AWS
With AWS resources in place, you can now configure Kubernetes to use them.
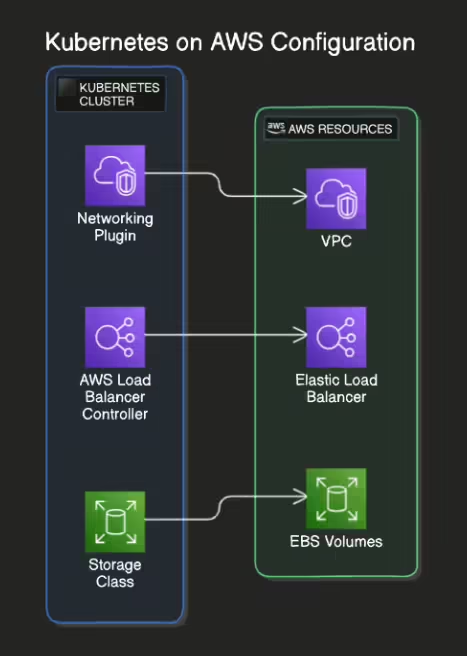
3.1 Install AWS Load Balancer Controller
Kubernetes requires an AWS Load Balancer Controller to manage Elastic Load Balancers for routing traffic.
- Install the controller in your Kubernetes cluster using
helm:
helm repo add eks https://aws.github.io/eks-charts

helm install aws-load-balancer-controller eks/aws-load-balancer-controller \
  --set clusterName=my-cluster \
  --set serviceAccount.create=false \
  --set region=us-east-1
3.2 Configure Storage Classes
To use AWS EBS volumes with Kubernetes, configure storage classes.
- Create a
StorageClassresource to define how EBS volumes are dynamically provisioned:
apiVersion: storage.k8s.io/v1
kind: StorageClass
metadata:
  name: gp2
provisioner: kubernetes.io/aws-ebs
parameters:
  type: gp2
reclaimPolicy: Delete
volumeBindingMode: Immediate
Apply the configuration:
kubectl apply -f storageclass.yaml
3.3 Set Up Kubernetes Networking on AWS
For Kubernetes networking on AWS, you can use Calico or CNI plugin options. The following steps use the CNI plugin.
- Install the AWS VPC CNI plugin:
kubectl apply -f https://raw.githubusercontent.com/aws/amazon-vpc-cni-k8s/master/config/v1.8/aws-k8s-cni.yaml
This plugin allows Kubernetes pods to use AWS VPC networking, improving performance and security.
Step 4: Deploy Applications on AWS
With your Kubernetes cluster integrated with AWS, you can deploy applications that leverage AWS services.
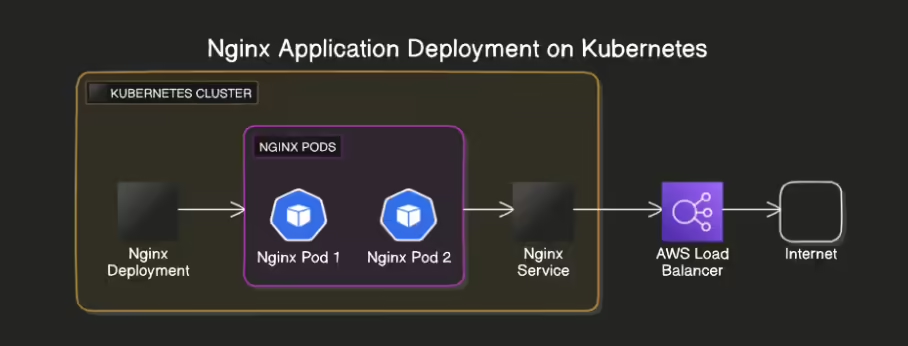
4.1 Deploy a Sample Application
Deploy a sample Nginx application on your Kubernetes cluster.
- Create a
Deploymentmanifest for Nginx:
apiVersion: apps/v1
kind: Deployment
metadata:
  name: nginx-deployment
spec:
  replicas: 2
  selector:
    matchLabels:
      app: nginx
  template:
    metadata:
      labels:
        app: nginx
    spec:
      containers:
      - name: nginx
        image: nginx:1.17
        ports:
        - containerPort: 80
2. Apply the deployment:
kubectl apply -f nginx-deployment.yaml
3. Create a Service to expose the application via a Load Balancer:
apiVersion: v1
kind: Service
metadata:
  name: nginx-service
spec:
  type: LoadBalancer
  selector:
    app: nginx
  ports:
  - protocol: TCP
    port: 80
    targetPort: 80
Apply the service manifest:
kubectl apply -f nginx-service.yaml
4.2 Verify the Application
After deployment, verify that your application is running on AWS.
- Get the external IP of the load balancer:
kubectl get svc nginx-service
2. Access the application in your browser by navigating to the external IP address.
Step 5: Monitor and Scale Kubernetes Applications
AWS provides several services for monitoring and scaling Kubernetes applications, such as CloudWatch and Auto Scaling Groups.
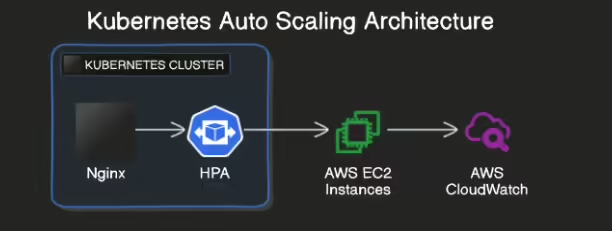
5.1 Monitor Kubernetes with CloudWatch
- Install the CloudWatch agent on your Kubernetes cluster to monitor logs and metrics:
kubectl apply -f https://raw.githubusercontent.com/aws/amazon-cloudwatch-agent-k8s/main/cwagent-daemonset.yaml
5.2 Enable Auto Scaling
To scale your applications dynamically, enable Kubernetes Horizontal Pod Autoscaler (HPA).
- Configure HPA for your application:
apiVersion: autoscaling/v1
kind: HorizontalPodAutoscaler
metadata:
  name: nginx-hpa
spec:
  scaleTargetRef:
    apiVersion: apps/v1
    kind: Deployment
    name: nginx-deployment
  minReplicas: 2
  maxReplicas: 10
  targetCPUUtilizationPercentage: 50
Apply the HPA configuration:
kubectl apply -f nginx-hpa.yaml
Kubernetes will automatically scale your application based on CPU utilization.
Conclusion
In this tutorial, you successfully integrated Kubernetes with AWS by setting up the required AWS resources, configuring the Kubernetes cluster, and deploying a sample application. This integration allows you to take advantage of AWS services like Elastic Load Balancing and EBS for persistent storage. In the next part, we will cover Kubernetes integration with Google Cloud.