
For Docker containers to communicate with each other and the outside world via the host machine, there has to be a layer of networking involved. Docker supports different types of networks, each fit for certain use cases.
What are different types of Networking in Docker?
Docker comes with network drivers geared towards different use cases. Docker’s networking subsystem is pluggable, using drivers.
What is docker0 in terms of Docker Networking?
When Docker is installed, a default bridge network named docker0 is created. Each new Docker container is automatically attached to this network, unless a custom network is specified.
Besides docker0, two other networks get created automatically by Docker: host(no isolation between host and containers on this network, to the outside world they are on the same network) and none(attached containers run on container-specific network stack)
Bridge networks
The Bridge network connect two networks while creating a single aggregate network from multiple communication networks or network segments, hence the name bridge.
The bridge driver creates a private network internal to the host so containers on this network can communicate. External access is granted by exposing ports to containers. Docker secures the network by managing rules that block connectivity between different Docker networks.
Behind the scenes, the Docker Engine creates the necessary Linux bridges, internal interfaces, iptables rules, and host routes to make this connectivity possible. In the example highlighted below, a Docker bridge network is created and two containers are attached to it. With no extra configuration the Docker Engine does the necessary wiring, provides service discovery for the containers, and configures security rules to prevent communication to other networks. A built-in IPAM driver provides the container interfaces with private IP addresses from the subnet of the bridge network.
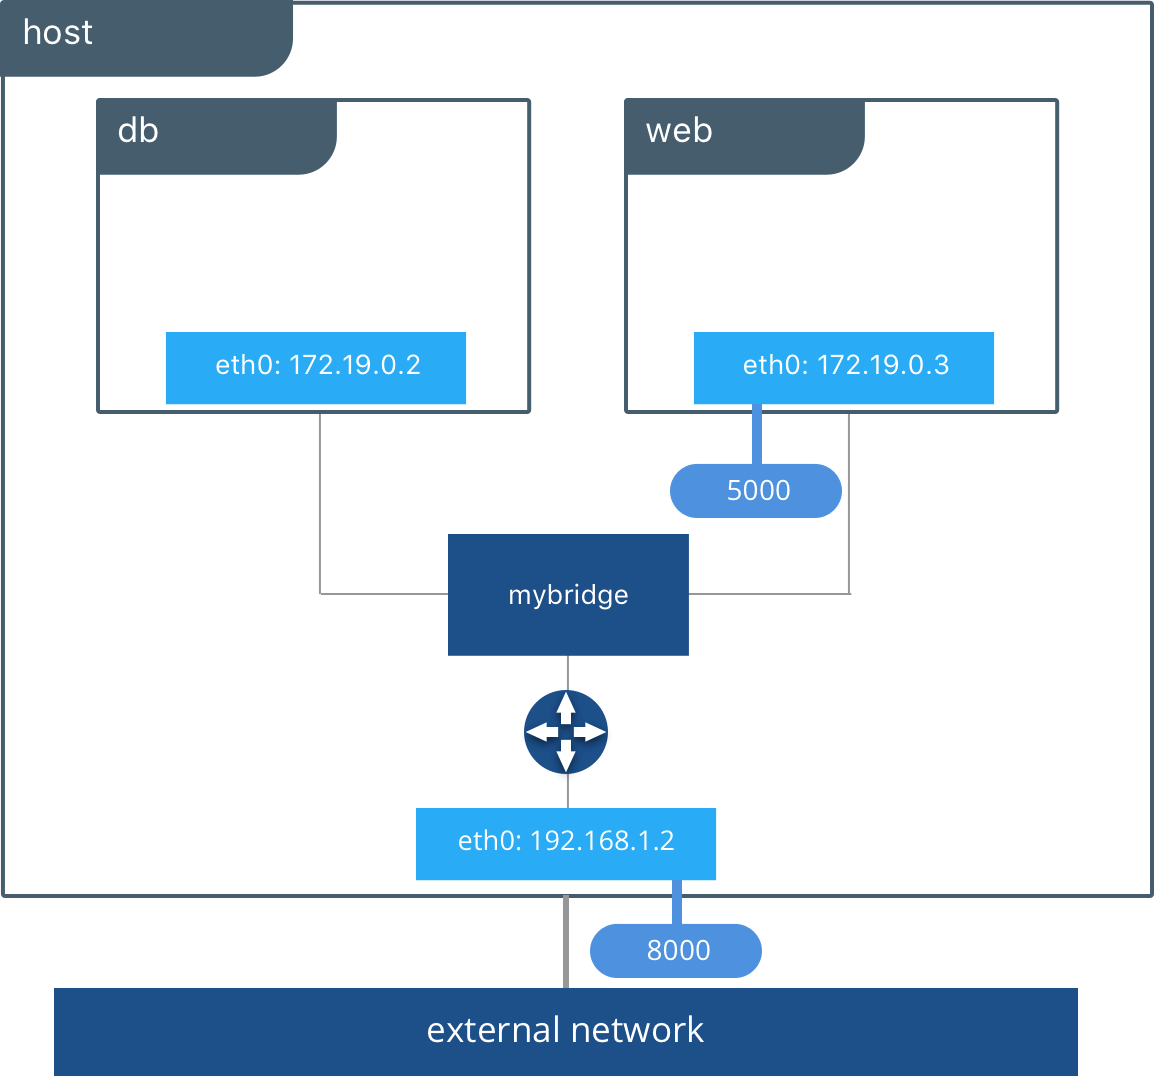
The above application is now being served on our host at port 8000. The Docker bridge is allowing web to communicate with db by its container name. The bridge driver does the service discovery for us automatically because they are on the same network. All of the port mappings, security rules, and pipework between Linux bridges is handled for us by the networking driver as containers are scheduled and rescheduled across a cluster.
The bridge driver is a local scope driver, which means it only provides service discovery, IPAM, and connectivity on a single host. Multi-host service discovery requires an external solution that can map containers to their host location. This is exactly what makes the overlay driver so great.
In this section, you’ll learn how to build, manage, and use bridge networks.
- Step 1 – The default bridge network
- Step 2 – Connect a container to the default bridge network
- Step 3 – Test the network connectivity
- Step 4 – Configure NAT for external access
Prerequisites
You will need all of the following to complete this lab:
- A Docker host
Step 1: The default bridge network
Every clean installation of Docker comes with a pre-built network called bridge. Verify this with the docker network ls command.
$ docker network ls
NETWORK ID          NAME                DRIVER              SCOPE
1befe23acd58        bridge              bridge              local
726ead8f4e6b        host                host                local
ef4896538cc7        none                null                local
The output above shows that the bridge network is associated with the bridge driver. It’s important to note that the network and the driver are connected, but they are not the same. In this example the network and the driver have the same name – but they are not the same thing!
The output above also shows that the bridge network is scoped locally. This means that the network only exists on this Docker host. This is true of all networks using the bridge driver – the bridge driver provides single-host networking.
All networks created with the bridge driver are based on a Linux bridge (a.k.a. a virtual switch).
Install the brctl command and use it to list the Linux bridges on your Docker host.
# Install the brctl tools

$ apt-get install bridge-utils
<Snip>

# List the bridges on your Docker host

$ brctl show
bridge name     bridge id               STP enabled     interfaces
docker0         8000.0242f17f89a6       no
The output above shows a single Linux bridge called docker0. This is the bridge that was automatically created for the bridge network. You can see that it has no interfaces currently connected to it.
You can also use the ip command to view details of the docker0 bridge.
$ ip a
<Snip>
3: docker0: <NO-CARRIER,BROADCAST,MULTICAST,UP> mtu 1500 qdisc noqueue state DOWN group default
    link/ether 02:42:f1:7f:89:a6 brd ff:ff:ff:ff:ff:ff
    inet 172.17.0.1/16 scope global docker0
       valid_lft forever preferred_lft forever
    inet6 fe80::42:f1ff:fe7f:89a6/64 scope link
       valid_lft forever preferred_lft forever
Step 2: Connect a container
The bridge network is the default network for new containers. This means that unless you specify a different network, all new containers will be connected to the bridge network.
Create a new container.
$ docker run -dt ubuntu sleep infinity
6dd93d6cdc806df6c7812b6202f6096e43d9a013e56e5e638ee4bfb4ae8779ce
This command will create a new container based on the ubuntu:latest image and will run the sleep command to keep the container running in the background. As no network was specified on the docker run command, the container will be added to the bridge network.
Run the brctl show command again.
$ brctl show
bridge name     bridge id               STP enabled     interfaces
docker0         8000.0242f17f89a6       no              veth3a080f
Notice how the docker0 bridge now has an interface connected. This interface connects the docker0 bridge to the new container just created.
Inspect the bridge network again to see the new container attached to it.
$ docker network inspect bridge
<Snip>
        "Containers": {
            "6dd93d6cdc806df6c7812b6202f6096e43d9a013e56e5e638ee4bfb4ae8779ce": {
                "Name": "reverent_dubinsky",
                "EndpointID": "dda76da5577960b30492fdf1526c7dd7924725e5d654bed57b44e1a6e85e956c",
                "MacAddress": "02:42:ac:11:00:02",
                "IPv4Address": "172.17.0.2/16",
                "IPv6Address": ""
            }
        },
<Snip>
Step 3: Test network connectivity
The output to the previous docker network inspect command shows the IP address of the new container. In the previous example it is “172.17.0.2” but yours might be different.
Ping the IP address of the container from the shell prompt of your Docker host. Remember to use the IP of the container in your environment.
$ ping 172.17.0.2
64 bytes from 172.17.0.2: icmp_seq=1 ttl=64 time=0.069 ms
64 bytes from 172.17.0.2: icmp_seq=2 ttl=64 time=0.052 ms
64 bytes from 172.17.0.2: icmp_seq=3 ttl=64 time=0.050 ms
64 bytes from 172.17.0.2: icmp_seq=4 ttl=64 time=0.049 ms
64 bytes from 172.17.0.2: icmp_seq=5 ttl=64 time=0.049 ms
^C
--- 172.17.0.2 ping statistics ---
5 packets transmitted, 5 received, 0% packet loss, time 3999ms
rtt min/avg/max/mdev = 0.049/0.053/0.069/0.012 ms
Press Ctrl-C to stop the ping. The replies above show that the Docker host can ping the container over the bridge network.
Log in to the container, install the ping program and ping www.dockercon.com.
# Get the ID of the container started in the previous step.
$ docker ps
CONTAINER ID    IMAGE    COMMAND             CREATED  STATUS  NAMES
6dd93d6cdc80    ubuntu   "sleep infinity"    5 mins   Up      reverent_dubinsky

# Exec into the container
$ docker exec -it 6dd93d6cdc80 /bin/bash

# Update APT package lists and install the iputils-ping package
root@6dd93d6cdc80:/# apt-get update
 <Snip>

 apt-get install iputils-ping
 Reading package lists... Done
<Snip>

# Ping www.dockercon.com from within the container
root@6dd93d6cdc80:/# ping www.dockercon.com
PING www.dockercon.com (104.239.220.248) 56(84) bytes of data.
64 bytes from 104.239.220.248: icmp_seq=1 ttl=39 time=93.9 ms
64 bytes from 104.239.220.248: icmp_seq=2 ttl=39 time=93.8 ms
64 bytes from 104.239.220.248: icmp_seq=3 ttl=39 time=93.8 ms
^C
--- www.dockercon.com ping statistics ---
3 packets transmitted, 3 received, 0% packet loss, time 2002ms
rtt min/avg/max/mdev = 93.878/93.895/93.928/0.251 ms
This shows that the new container can ping the internet and therefore has a valid and working network configuration.
Step 4: Configure NAT for external connectivity
In this step we’ll start a new NGINX container and map port 8080 on the Docker host to port 80 inside of the container. This means that traffic that hits the Docker host on port 8080 will be passed on to port 80 inside the container.
NOTE: If you start a new container from the official NGINX image without specifying a command to run, the container will run a basic web server on port 80.
Start a new container based off the official NGINX image.
$ docker run --name web1 -d -p 8080:80 nginx
Unable to find image 'nginx:latest' locally
latest: Pulling from library/nginx
386a066cd84a: Pull complete
7bdb4b002d7f: Pull complete
49b006ddea70: Pull complete
Digest: sha256:9038d5645fa5fcca445d12e1b8979c87f46ca42cfb17beb1e5e093785991a639
Status: Downloaded newer image for nginx:latest
b747d43fa277ec5da4e904b932db2a3fe4047991007c2d3649e3f0c615961038
Check that the container is running and view the port mapping.
$ docker ps
CONTAINER ID    IMAGE               COMMAND                  CREATED             STATUS              PORTS                           NAMES
b747d43fa277   nginx               "nginx -g 'daemon off"   3 seconds ago       Up 2 seconds        443/tcp, 0.0.0.0:8080->80/tcp   web1
6dd93d6cdc80        ubuntu              "sleep infinity"         About an hour ago   Up About an hour                                    reverent_dubinsky
There are two containers listed in the output above. The top line shows the new web1 container running NGINX. Take note of the command the container is running as well as the port mapping – 0.0.0.0:8080->80/tcp maps port 8080 on all host interfaces to port 80 inside the web1 container. This port mapping is what effectively makes the containers web service accessible from external sources (via the Docker hosts IP address on port 8080).
Now that the container is running and mapped to a port on a host interface you can test connectivity to the NGINX web server.
To complete the following task you will need the IP address of your Docker host. This will need to be an IP address that you can reach (e.g. if your lab is in AWS this will need to be the instance’s Public IP).
Point your web browser to the IP and port 8080 of your Docker host. The following example shows a web browser pointed to 52.213.169.69:8080

If you try connecting to the same IP address on a different port number it will fail.
If for some reason you cannot open a session from a web broswer, you can connect from your Docker host using the curl command.
$ curl 127.0.0.1:8080
<!DOCTYPE html>
<html>
<head>
<title>Welcome to nginx!</title>
    <Snip>
<p><em>Thank you for using nginx.</em></p>
</body>
</html>
Overlay networks
The Overlay Network are usually used to create a virtual network between two separate hosts. Virtual, since the network is build over an existing network.
The built-in Docker overlay network driver radically simplifies many of the complexities in multi-host networking. It is a swarm scope driver, which means that it operates across an entire Swarm or UCP cluster rather than individual hosts. With the overlay driver, multi-host networks are first-class citizens inside Docker without external provisioning or components. IPAM, service discovery, multi-host connectivity, encryption, and load balancing are built right in. For control, the overlay driver uses the encrypted Swarm control plane to manage large scale clusters at low convergence times.
The overlay driver utilizes an industry-standard VXLAN data plane that decouples the container network from the underlying physical network (the underlay). This has the advantage of providing maximum portability across various cloud and on-premises networks. Network policy, visibility, and security is controlled centrally through the Docker Universal Control Plane (UCP).
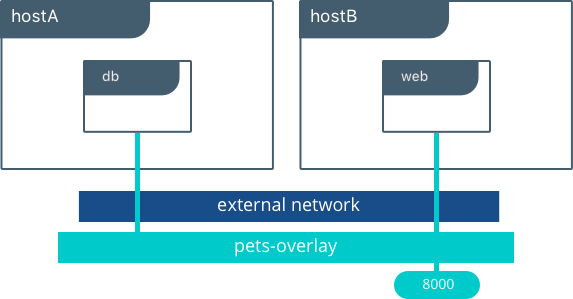
In the above example we are still serving our web app on port 8000 but now we have deployed our application across different hosts. If we wanted to scale our web containers, Swarm & UCP networking would load balance the traffic for us automatically.
The overlay driver is a feature-rich driver that handles much of the complexity and integration that organizations struggle with when crafting piecemeal solutions. It provides an out-of-the-box solution for many networking challenges and does so at scale.
Overlay Driver Network Architecture
The built-in Docker overlay network driver radically simplifies many of the challenges in multi-host networking. With the overlay driver, multi-host networks are first-class citizens inside Docker without external provisioning or components. overlay uses the Swarm-distributed control plane to provide centralized management, stability, and security across very large scale clusters.
VXLAN Data Plane
The overlay driver utilizes an industry-standard VXLAN data plane that decouples the container network from the underlying physical network (the underlay). The Docker overlay network encapsulates container traffic in a VXLAN header which allows the traffic to traverse the physical Layer 2 or Layer 3 network. The overlay makes network segmentation dynamic and easy to control no matter what the underlying physical topology. Use of the standard IETF VXLAN header promotes standard tooling to inspect and analyze network traffic.
VXLAN has been a part of the Linux kernel since version 3.7, and Docker uses the native VXLAN features of the kernel to create overlay networks. The Docker overlay datapath is entirely in kernel space. This results in fewer context switches, less CPU overhead, and a low-latency, direct traffic path between applications and the physical NIC.
IETF VXLAN (RFC 7348) is a data-layer encapsulation format that overlays Layer 2 segments over Layer 3 networks. VXLAN is designed to be used in standard IP networks and can support large-scale, multi-tenant designs on shared physical network infrastructure. Existing on-premises and cloud-based networks can support VXLAN transparently.
VXLAN is defined as a MAC-in-UDP encapsulation that places container Layer 2 frames inside an underlay IP/UDP header. The underlay IP/UDP header provides the transport between hosts on the underlay network. The overlay is the stateless VXLAN tunnel that exists as point-to-multipoint connections between each host participating in a given overlay network. Because the overlay is independent of the underlay topology, applications become more portable. Thus, network policy and connectivity can be transported with the application whether it is on-premises, on a developer desktop, or in a public cloud.

In this diagram we see the packet flow on an overlay network. Here are the steps that take place when c1 sends c2 packets across their shared overlay network:
c1does a DNS lookup forc2. Since both containers are on the same overlay network the Docker Engine local DNS server resolvesc2to its overlay IP address10.0.0.3.- An overlay network is a L2 segment so
c1generates an L2 frame destined for the MAC address ofc2. - The frame is encapsulated with a VXLAN header by the
overlaynetwork driver. The distributed overlay control plane manages the locations and state of each VXLAN tunnel endpoint so it knows thatc2resides onhost-Bat the physical address of192.168.1.3. That address becomes the destination address of the underlay IP header. - Once encapsulated the packet is sent. The physical network is responsible of routing or bridging the VXLAN packet to the correct host.
- The packet arrives at the
eth0interface ofhost-Band is decapsulated by theoverlaynetwork driver. The original L2 frame fromc1is passed to thec2‘seth0interface and up to the listening application.
Overlay Driver Internal Architecture
The Docker Swarm control plane automates all of the provisioning for an overlay network. No VXLAN configuration or Linux networking configuration is required. Data-plane encryption, an optional feature of overlays, is also automatically configured by the overlay driver as networks are created. The user or network operator only has to define the network (docker network create -d overlay ...) and attach containers to that network.

During overlay network creation, Docker Engine creates the network infrastructure required for overlays on each host. A Linux bridge is created per overlay along with its associated VXLAN interfaces. The Docker Engine intelligently instantiates overlay networks on hosts only when a container attached to that network is scheduled on the host. This prevents sprawl of overlay networks where connected containers do not exist.
In the following example we create an overlay network and attach a container to that network. We’ll then see that Docker Swarm/UCP automatically creates the overlay network.
#Create an overlay named "ovnet" with the overlay driver
$ docker network create -d overlay ovnet

#Create a service from an nginx image and connect it to the "ovnet" overlay network
$ docker service create --network ovnet --name container nginx
When the overlay network is created, you will notice that several interfaces and bridges are created inside the host.
# Run the "ifconfig" command inside the nginx container
$ docker exec -it container ifconfig

#docker_gwbridge network
eth1      Link encap:Ethernet  HWaddr 02:42:AC:12:00:04
          inet addr:172.18.0.4  Bcast:0.0.0.0  Mask:255.255.0.0
          inet6 addr: fe80::42:acff:fe12:4/64 Scope:Link
          UP BROADCAST RUNNING MULTICAST  MTU:1500  Metric:1
          RX packets:8 errors:0 dropped:0 overruns:0 frame:0
          TX packets:8 errors:0 dropped:0 overruns:0 carrier:0
          collisions:0 txqueuelen:0
          RX bytes:648 (648.0 B)  TX bytes:648 (648.0 B)

#overlay network
eth2      Link encap:Ethernet  HWaddr 02:42:0A:00:00:07
          inet addr:10.0.0.7  Bcast:0.0.0.0  Mask:255.255.255.0
          inet6 addr: fe80::42:aff:fe00:7/64 Scope:Link
          UP BROADCAST RUNNING MULTICAST  MTU:1450  Metric:1
          RX packets:8 errors:0 dropped:0 overruns:0 frame:0
          TX packets:8 errors:0 dropped:0 overruns:0 carrier:0
          collisions:0 txqueuelen:0
          RX bytes:648 (648.0 B)  TX bytes:648 (648.0 B)

#container loopback
lo        Link encap:Local Loopback
          inet addr:127.0.0.1  Mask:255.0.0.0
          inet6 addr: ::1/128 Scope:Host
          UP LOOPBACK RUNNING  MTU:65536  Metric:1
          RX packets:48 errors:0 dropped:0 overruns:0 frame:0
          TX packets:48 errors:0 dropped:0 overruns:0 carrier:0
          collisions:0 txqueuelen:0
          RX bytes:4032 (3.9 KiB)  TX bytes:4032 (3.9 KiB)
Two interfaces have been created inside the container that correspond to two bridges that now exist on the host. On overlay networks, each container will have at least two interfaces that connect it to the overlay and the docker_gwbridge.
| Bridge | Purpose |
|---|---|
| overlay | The ingress and egress point to the overlay network that VXLAN encapsulates and (optionally) encrypts traffic going between containers on the same overlay network. It extends the overlay across all hosts participating in this particular overlay. One will exist per overlay subnet on a host, and it will have the same name that a particular overlay network is given. |
| docker_gwbridge | The egress bridge for traffic leaving the cluster. Only one docker_gwbridge will exist per host. Container-to-Container traffic is blocked on this bridge allowing ingress/egress traffic flows only. |
The Docker Overlay driver has existed since Docker Engine 1.9, and an external K/V store was required to manage state for the network. Docker 1.12 integrated the control plane state into Docker Engine so that an external store is no longer required. 1.12 also introduced several new features including encryption and service load balancing. Networking features that are introduced require a Docker Engine version that supports them, and using these features with older versions of Docker Engine is not supported.
MacVLAN networks
Say, you have built Docker applications(legacy in nature like network traffic monitoring, system management etc.) which is expected to be directly connected to the underlying physical network. In this type of situation, you can use the macvlan network driver to assign a MAC address to each container’s virtual network interface, making it appear to be a physical network interface directly connected to the physical network.
Why do we need it
- Explicit control over container IP assignment
- We need container IP directly in underlay network managed by enterprise.
- Connect container to legacy applications
- Connect container to external network without overlay overhead.
- Have a need to preserve source IP of container.
Traffic flows through eth0 and Docker routes traffic to your container using its MAC address. To network devices on your network, your container appears to be physically attached to the network.
Create a macvlan network called macvlan-mynet
$ docker network create -d macvlan \
  --subnet=192.10.86.0/24 \
  --gateway=192.10.86.1 \
  -o parent=eth1 \
  macvlan-mynet
List macvlan networks
$ docker network ls
NETWORK ID          NAME                DRIVER              SCOPE
bef0002ef343        bridge              bridge              local
0ce752a109ad        host                host                local
a4a33de2232b        macvlan-mynet       macvlan             local
631e4ef63d66        none                null                local
$ docker network inspect macvlan-mynet
[
    {
        "Name": "macvlan-mynet",
        "Id": "a4a33de2232bdbfb0ea954f1dff43755e001fdcd9ad174368feaf0d0ff5859c2",
        "Created": "2018-06-07T10:25:43.24356479Z",
        "Scope": "local",
        "Driver": "macvlan",
        "EnableIPv6": false,
        "IPAM": {
            "Driver": "default",
            "Options": {},
            "Config": [
                {
                    "Subnet": "192.10.86.0/24",
                    "Gateway": "192.10.86.1"
                }
            ]
        },
        "Internal": false,
        "Attachable": false,
        "Ingress": false,
        "ConfigFrom": {
            "Network": ""
        },
        "ConfigOnly": false,
        "Containers": {},
        "Options": {
            "parent": "eth1"
        },
        "Labels": {}
    }
]
Check that both containers are actually started
$ docker container ls
CONTAINER ID        IMAGE               COMMAND             CREATED             STATUS              PORTS               NAMES
602dbf1edc81        alpine              "ash"               4 seconds ago       Up 3 seconds                            alpine2
da33b7aa74b0        alpine              "ash"               17 seconds ago      Up 16 seconds                           alpine1
- Start and attach an alpine container to the macvlan-mynet network
$ docker run --rm -itd \
  --network macvlan-mynet \
  --name macvlan-alpine \
  alpine:latest \
  ash
Inspect the macvlan-alpine container and notice the MacAddress key within the Networks key
$ docker container inspect macvlan-alpine
...truncated...
"Networks": {
  "my-macvlan-net": {
      "IPAMConfig": null,
      "Links": null,
      "Aliases": [
          "bec64291cd4c"
      ],
      "NetworkID": "5e3ec79625d388dbcc03dcf4a6dc4548644eb99d58864cf8eee2252dcfc0cc9f",
      "EndpointID": "8caf93c862b22f379b60515975acf96f7b54b7cf0ba0fb4a33cf18ae9e5c1d89",
      "Gateway": "192.10.86.1",
      "IPAddress": "192.10.86.2",
      "IPPrefixLen": 24,
      "IPv6Gateway": "",
      "GlobalIPv6Address": "",
      "GlobalIPv6PrefixLen": 0,
      "MacAddress": "02:42:ac:10:56:02",
      "DriverOpts": null
  }
}
...truncated
Run docker exec commands
$ docker exec macvlan-alpine ip route default via 192.10.86.1 dev eth0 172.16.86.0/24 dev eth0 scope link src 172.16.86.2
Now root user within alpine2 container.
Stop container and remove the macvlan network
$ docker container stop macvlan-alpine

$ docker network rm macvlan-mynet